Intel and AMD steps for beginners
Overclocking sounds like a dangerous dark art, but there’s nothing to fear. In fact, it’s an opportunity: it’s never been easier to tweak your processor for high performance. Here, we’ll walk you through the basics, fix confusing jargon, and give you the essential advice you need to get started.No need for extra money to boost performance, which is definitely worth investigating. But remember that knowledge is king – so this guide will explain key overclocking concepts and how to get started.
What is overclocking and how does it help performance?
Contents
First, a little science. The most important overclocking concept is the clock itself, which is measured in Hertz and is most commonly written as megahertz (one million Hertz, MHz) or gigahertz (one billion Hertz, GHz). This refers to the speed of the small oscillator inside a processor that regulates the electronic pulses that run through the chip. We are talking here about billions of pulses per second, and it is these pulses that handle everything a processor does. The clock runs in cycles and overclocking is the process of accelerating the internal clock. As more cycles are completed, more tasks are completed – which means faster processor. This brings many benefits. For example, if you run advanced multi-tasking or intensive productivity tools, your work will get done faster. Gamers love to overclock to fuel the latest titles and thousands of people see overclocking as a sport – no surprise, because those with the highest speeds will end up with big bucks. . Overclocking can be a free alternative to upgrading an older CPU, and simple tweaks can breathe new life into an older system. Overclocking can void the processor’s warranty, and the extra electrical and thermal demands can also overheat the processor, potentially reducing its lifespan. Therefore, overclocking is always done at your own risk – although if you play it safe, it’s unlikely you’ll experience terminal issues.
Key concepts of overclocking
A little research will reveal that there are key ideas that govern all processor overclocking, regardless of chip. basic clock and multiplierBase clock – commonly known as BCLK – is the reference speed used by the processor, memory and PCI connectors on your motherboard; it needs to be low level to allow those different components to work in sync. On modern motherboards it is set to 100MHz. It is combined with the multiplier to determine the processor’s advertised clock speed. Here is an example. Intel’s Core i5-7600K has a base clock of 100MHz (0.1GHz) and a multiplier of 38 – multiply both and you’ll get an official clock speed of 3.8GHz.Related: Best Pre-made DesktopsNo processor will operate without power, and overclocking can require more voltage than usual. Microprocessors are relatively efficient, so we’re only talking about very small amounts of power – but increasing the clock speed will significantly increase the chip’s power requirements (relatively speaking). Let’s get back to the Core i5-7600K: at its standard speed it usually draws less than 1V, but overclocking to closer to 5GHz would require around 1.4V. AMD’s chips are faster: The Ryzen 7 1800X runs at 3.6GHz and needs around 1.2V by default, with boosts to around 1.45V depending on your overclocking ambitions.
What you need
The first thing you need is a processor with an unlocked multiplier. On the Intel side, that means a chip with a K suffix – such as a Core i5-7600K or Core i7-7700K. On the AMD side, all of the company’s new Ryzen processors are unlocked, and the older chips can be overclocked if they’re Black Edition parts. added: how to write worldfluid characters | Top Q&AT That’s an important first step, but it’s not just about the processor. You will also need a motherboard that supports overclocking. To find out if your board has a mustard cut, check its chipset. Intel chipsets like the H170, H270, and H110 don’t support overclocking, but higher-end silicon like the Z170 and Z270 do. On the AMD side, the X370, X300 and B350 chipsets can be overclocked, but the A320 and A300 cannot. This feature is not included. It’s easy to identify the chipset you’re running, as your motherboard’s model name will include it. Motherboards have other attributes that make them suitable for overclocking. Larger heatsinks will do a better job of keeping components cool if you’re using higher voltages, and gaming and enthusiast motherboards have dedicated buttons and screens for fine-tuning. troubleshoot and diagnose problems. The extra heat means it sometimes makes sense to have a more capable third-party cooler; Intel and AMD’s standard coolers aren’t really designed for the rigors of overclocking. However, this doesn’t mean a big investment: you can buy a suitable cooler for around £20. Increased power also means more power consumption, so make sure your power supply can handle it. We recommend using a 500W PSU as a minimum, but 600W will be more comfortable, especially for high-end devices with powerful graphics cards. Always better if there is room for future power needs, overclocking also requires the right software – and a lot of patience. Before you start, install a free benchmark like Cinebench R15 to test single and multithreaded performance. It’s perfect for running before and after overclocking, so you can find your initial performance levels and measure the gains. Also, download Prime95, which stresses the processor at 100% load – if your overclock passes this test, it should be fine. Finally, before you start tweaking, make sure to update your PC’s BIOS and drivers. If you are unsure, visit your motherboard manufacturer’s website to find the latest versions.
How to overclock safely
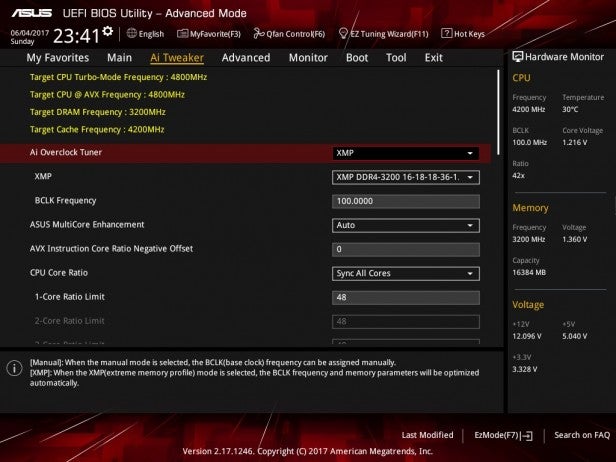
Most of the overclocking takes place in the BIOS, which is software that can be accessed before the PC boots into Windows. You usually access it by pressing the Escape, F2, or F12 key repeatedly before Windows starts to boot. Check your motherboard manual for instructions. Every BIOS looks different, so don’t worry if it doesn’t look good. If your board supports overclocking you’ll find options there somewhere Most BIOS applications these days include sections dedicated to tweaking – for example look for Frequency Settings Advanced Performance, Overclock Settings or Extreme Tweaker. for settings like the following. CPU frequency and multiplier can be called Frequency BCLK or CPU core ratio. Make sure scale setting is set to sync all cores to same speed and find voltage setting for later – CPU voltage can be listed as VCore instead of.
Overclocking with Intel
The fundamentals of overclocking are the same between processors from Intel and AMD, but there are slight differences between the two companies. and control the core voltage and multiplier until you get a solid, stable fine-tuning. Aswell and Skylake processors peak at 105°C, while Kaby Lake peaks at 100°C. However, these numbers would be rudimentary as no overclocker has been able to achieve these levels that if you feel reasonable. The processor can be unlocked for the laptop. Advanced users will also be interested in discovering a properly unlocked base clock that allows for more fine-tuning since you’re not locked to multiples of 100MHz.
Overclocking with AMD Ryzen
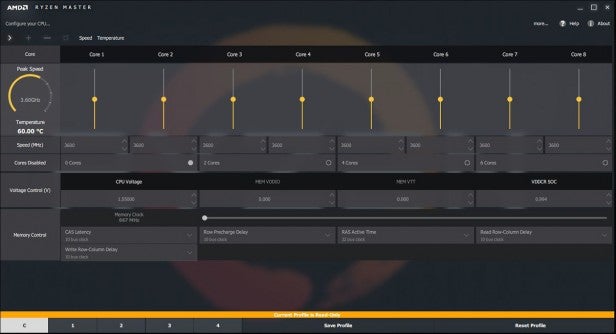
AMD’s Ryzen processors have shaken the CPU world due to their combination of great performance and low prices, but these chips also take a new approach to overclocking thanks to an app called Ryzen. Master. This tool runs in Windows and is designed to make tweaking the processor easier and more accessible. Once it’s installed, enable the app’s OC Mode, then dive in. The sliders allow for individual or processor-wide core speed adjustments, and they’re paired with arrows to increase or decrease CPU voltage.
Inference
Overclocking is much easier these days than it used to be, meaning great performance can be achieved without spending a dime – or at least without buying an expensive new processor. So it was fascinating and our guide covered the basics and the steps you’ll need to get started. So when you’re ready, we’ll see you in the BIOS. Read more: How to draw toilet | Top Q&A
Last, Wallx.net sent you details about the topic “Intel and AMD steps for beginners❤️️”.Hope with useful information that the article “Intel and AMD steps for beginners” It will help readers to be more interested in “Intel and AMD steps for beginners [ ❤️️❤️️ ]”.
Posts “Intel and AMD steps for beginners” posted by on 2021-08-16 15:38:07. Thank you for reading the article at wallx.net


