How to use cake stencils
Video How to Use Baking Stencils Looking for your truffle puffing strategy? Want an easy strategy for buttercream embellishment? Using stencils is a simple and fun strategy to enhance your cake decorating expertise. Using stencils to light cakes allows you to create ornate designs without spending hours trying to do it freely. You’ll love how easy they are to use and what a great way to get top results. Read: How to use stencils to make cakes.
Benefits of using stencils
Contents
Let’s face it, not all of us have a creative side. We can try for hours to perfect a cake design and by no means have to make it right. Stencils allow you to create intricate designs without the need for creative means. Stencils are easy to use and low cost. They are commonly available in cake decorating stores, online, and in some grocery stores. They come in quite a few different designs and sizes. You don’t want to use stencils or any other creative medium to make the cake. However, taking advantage of them will make you look like a witch adorning the cake.Another beauty of stencils is that they are reusable. After each use, you can wash them with hot water and cleaning soap and use them as many times as you like. Using meal colors, you can create a variety of gorgeous buttercream colors. Using stencils to lighten buttercream will save you time and stress.
Cake stencils: What you will have to observe in this tutorial
To follow the instructions for using stencils on the buttercream cake, you will need:
- Butter cream
- Stencils
- Wax paper or parchment
- Color Meal Gel
- Spatula
- Scissors
- Pipe bag
- Shortening
You can use store-bought buttercream or make your own. Usually, start with white buttercream at the bottom, however, you can choose whatever color you want. You can then set aside the buttercream which you will use for the stencils and add color to the meal to succeed in your required shades.
Stencils Step by step instructions
Read more: How long to bake turkey wings at 400Step One: Frost Your CakeCool your cake with buttercream frosting. Place it in the refrigerator and let it sit for at least an hour.Step two: Put the stencils togetherDetermine which stencils you’ll be using in your cake, and wash them sooner than used. You may have to use scissors to cut the stencils to fit the cake. Then take your stencil and evenly coat it with a short layer of glue, as this can help it stick to the cake.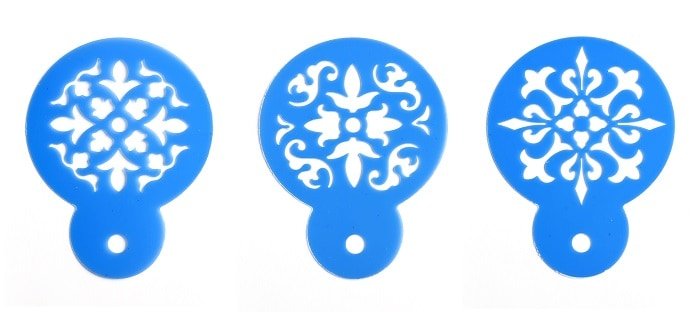 Step 3: Place the Stencil on the cake and add the buttercream frostingAs soon as your buttercream is cooled, take it out of the fridge. You can line your cake with a little wax or parchment with a thin layer of shortening to prevent smearing and give you room to relax. the bow. Take a piping bag of whipped cream and thoroughly pour inside the wax paper along with the desired color of buttercream. Alternatively, you can use a foaming spatula to gently melt the matte finish.Step 4: Take the StencilCleverly remove the stencils from the cake. If there is any stencil stuck to the cake, seriously take a knife to remove it. Wipe off excess matte on the parchment paper. Repeat until you achieve your required design on the cake.
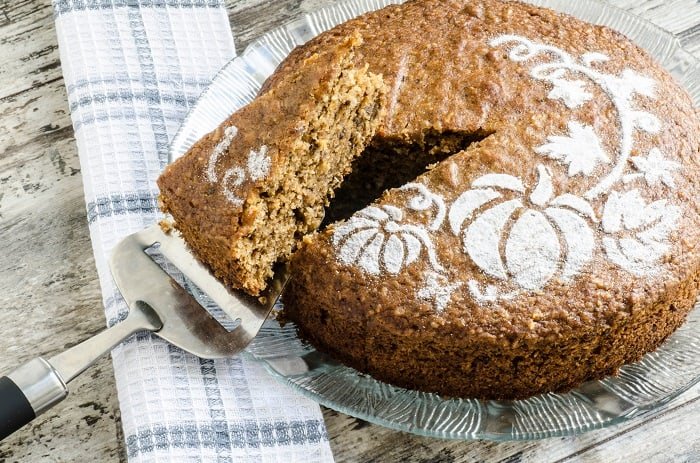 Read more: How to print a picture on a cake You can only use a cake spatula when frosting the stencils. Just be careful not to accidentally unfold the coating underneath the stencil while filling it in. Using the shortener will act as a glue and help hold your stencils in place, so make sure to put some in to minimize the chance of the stencils slipping.
Ideas and Methods
It is very important to make sure that the buttercream frosting on the cake is completely cooled. Freshly frosted buttercream will melt and it takes a lot of work to get an easy finish from using a pencil. Refrigerating the cake first allows the buttercream to harden, reducing the chance of buttercream melting and making it a better floor. It’s best to start with a less complicated pencil and work your way up to more and more complexity. Gel powder color works best with buttercream because it’s less likely to lose its look and requires far fewer drops. However, you should not use gel meal colors, any color will work.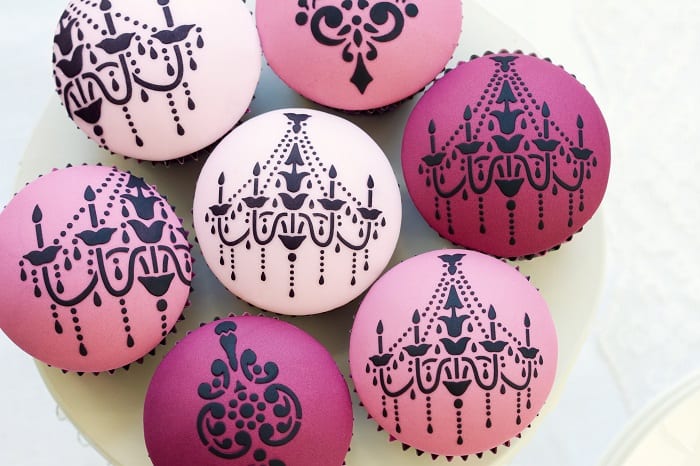 You can also use stencils to lighten the top of the cake. Just be careful when removing the wax paper so that the excess dough doesn’t spill over the cake. Airbrushing is another method used to lighten truffles with stencils, but it can be a bit difficult to get dangling at first. It can be stored in the refrigerator every week and in the freezer for six months. Let the cake succeed at room temperature earlier than serving. can serve. The warmth can activate designs made by stencils to soften and run some designs.
An Easy Technique To Make A Beautiful Cake
Stencils are a must-have to decorate the cake. They not only make your cake look flawless, but also allow you to decorate the cake in just a few minutes. Are you interested in researching tips on how to use wax paper for buttercream cakes? For those of you who enjoyed this text on using stencils on buttercream, please share it. Please comment if you loved this text or have any comments regarding this tutorial!
Last, Wallx.net sent you details about the topic “How to use cake stencils❤️️”.Hope with useful information that the article “How to use cake stencils” It will help readers to be more interested in “How to use cake stencils [ ❤️️❤️️ ]”.
Posts “How to use cake stencils” posted by on 2022-01-02 08:12:31. Thank you for reading the article at wallx.net


