How To Rebuild A Power Steering Pump
Rebuilding the Power Steering PUmpArticle from The Modern Collectible column, Skinned Knuckles Magazine, August, 2014by Orest LazarowichReading: how to rebuild a power steering pump

Bleeding Air From the Power Steering System
Contents
Air must be bled out of the power steering system to prevent pump damage (metal to metal contact), stop pump noise and ensure prop-er system operation. All hose connections must be tight as loose connections may not leak but can admit air into the system. Do not over tighten O-ring hoses as the O-ring may be crushed. Check flare type connections for exact fit. To prevent noise the hoses must not touch any part of the vehicle. Raise the front wheels, and set the vehicle on safety stands. Wipe the fluid reservoir clean, and remove the lid or cap. If the fluid appears foamy, there is air in the system. Fill with approved power steering fluid to the ‘cold’ level. Leave the lid or cap off. Slowly turn the steering wheel from lock to lock to cycle the system. Check the fluid level, and add fluid as necessary. It may take 15-20 cycles until the fluid stabilizes and no aeration appears in the reservoir. If you turn the steering wheel fast, the trapped air will bubble up the fluid and overflow the reservoir. When the fluid level stabilizes add fluid as necessary, and start the engine. If the pump runs smoothly and no air bubbles appear in the reservoir, the steering wheel should move easily. Replace the lid or cap. Lower the vehicle.If this vehicle is a new purchase for you and the power steering is erratic (jerky) and the pump is noisy, flush the old fluid out, and fill with the type recommended by the manufacturer. Raise the front of the vehicle on safety stands. Use a suction pump or turkey baster to empty the reservoir. Disconnect the return hose/line from the pump and direct the hose into a plastic jug. If the hose is not long enough, use a length of clear hose to extend it so it will reach the jug. Cap the return line fitting in the reservoir. Turn the steering wheel slowly back and forth a number of times just touching the stops to drain out more fluid. Fill the reservoir with recommended fluid, and start the engine. Run this fresh fluid through the pump and steering gear. DO NOT let the reservoir run dry. It may take up to a quart to flush the old fluid out. Keep adding fluid until the color changes. Shut the engine off. Connect the low pressure hose/line. Fill the reservoir full of fresh fluid. Start the engine, and let it idle. Turn the steering wheel back and forth a number of times. Check the fluid level in the reservoir, and add as needed. Repeat this step until no more air bubbles appear in the reservoir. Check for leaks, and lower the vehicle. Road test. If there is no difference in steering performance, the pump has to be removed for inspection and/or rebuild.There are a number of manufacturers including Saginaw, Thompson, Federal and Eaton that supply PS pumps. This procedure will discuss the vane-type Saginaw PS pump with integral reservoir that was used on GM products and also on AMC and Jeep, Chrysler cars and Dodge trucks, Ford cars and pickups and IHC trucks up to 1974. The reservoir design was changed in midyear 1971. The old reservoir is round with a long filler neck. The new design is tear-drop shaped with a very short filler neck. This is the only difference between them. Although the pump pressures vary among applications, the pump housing, internal parts and pump operation are the same. Rebuild and seal kits are available from auto parts stores. The rebuild kit includes a power steering shaft bushing. These pumps are easy to identify because they used a threaded 5/8 inch diameter pulley shaft with a woodruff key. Later models use a 3/4 inch shaft with a press-on pulley and no keyway. The fittings and fasteners changed to metric in 1980. The older pumps use inverted flare fittings and the newer ones use an O-ring fit-ting. These fittings are interchangeable so you can use a newer metric pump with the original invert-ed flare hoses. If you are planning to visit your local recycler to purchase a low mileage power steering pump, the last two digits of the casting number identify SAE and Metric pumps. SAE pump numbers end in 19 and Metric are 47. Use the original pressure valve and spring to maintain the proper pressure for the steering gear.
Removing the Power Steering Pump
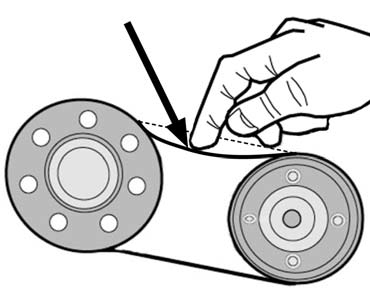
On a longitudinally mounted engine the power steering pump is mounted on the front of the engine. In this case it is at the top left of the engine and not at the bottom. Disconnect the negative (ground) cable connection at the battery. You might have to remove a radiator shroud. Loosen the adjustment bolt(s), and push the pump in toward the engine. Remove the drive belt(s). Examine the belt. If it is damaged or oil soaked, it must be replaced. Slide a drain pan under the engine to catch any fluid. Free the power steering hoses from any support brackets. Wipe the area clean around the hose connections. Disconnect the pressure line from the pump using a flare nut wrench. Cap the line to prevent dirt from entering, if you are reusing the line. Disconnect the return line. It is usually held in place by a clamp. Cap the line. Remove the pump from its brackets, and then pull it out of the engine compartment. Remove the filler cap, and empty the reservoir into the drain pan. Dispose of the old power steering fluid at the local recycle center.
Disassemble the Pump
Clean the outside of the pump. Work on a clean bench. Decide how you want to rebuild the pump. If the internal parts are not scored or worn, you can install a rebuild kit. If the reservoir is not bent or cracked but the pump needs rebuilding, you can exchange the pump and use the old reservoir. Or you can exchange the old pump assembly for a remanufactured pump assembly. Whatever you decide the pulley must come off first. In this procedure the Saginaw pumps up to 1974 used a threaded pump shaft. Remove the nut and washer, and pull off the pulley. Pumps after this date used a pressed on pulley. If you are exchanging the pressed on pulley pump assembly, the service shop will remove the old pulley, and if it is in good condition, press it on the exchange pump. Do not attempt to try and pull the pulley off with a 2 or 3 jaw puller. The pulley will distort, and you will end up buying a new pulley. See if your club or a club member has a puller available. If not, have the service shop remove and install the pulley for you. It is not practical to buy a puller kit to service one pump.Clamp the pump in a vise with the shaft pointing downward. Remove the mounting studs, and note their position if they are different lengths. Carefully remove the pressure hose fitting, but don’t let the pressure valve and spring fly out. Rock the reservoir back and forth to unseal the O-ring. Do not pry it off with a screwdriver because you will distort the edges of the reservoir and it may leak on assembly. Remove the reservoir. Examine the inside of the housing, and you may find a magnet attached to the flat part of the pump housing next to the mounting stud threads. Mark the position, and remove the magnet for cleaning. Remove the lock ring by inserting a small punch in the hole at the bottom of the casting to force the lock ring out. Press down on the end plate, and pry out the lock ring. Remove the end plate. Remove the pressure plate and the pressure plate spring. Locate the arrows on the eccentric housing, and note whether they are positioned at the front or the back. The housing must be put back in the same position on reassembly. Tip the pump over, and tap the shaft end with a soft-faced hammer to remove the pump ring, rotor assembly and thrust plate. Remove the small snap ring on the pump shaft. Slide the rotor and thrust plate from the shaft. Be careful to not lose any parts, and do not drop any of the steel vanes (10). Remove the two O-rings in the housing and the shaft seal.Read more: Alaskan Ulu Knife: How To Use And Where To BuyWash all the parts in clean solvent, and wipe them dry with a lint free cloth. Inspect for wear and damage. Check that the flow control valve moves freely in its bore. Inspect the pres-sure plate, ring, and thrust plate for scoring. Check the pump shaft for cracks, and if there is any side-to-side movement when fitted in the bushing, replace the bushing. Check the pump vanes for cracks, and make sure they move freely in the rotor. If the parts show very little wear, install a seal kit and bushing if necessary. Service the flow control valve. Examine the reservoir for nicks, warpage, deep rust spots and dents. If it is suitable for reuse, paint the outside gloss black. If the pump parts are worn, cracked or scored, reassemble the pump minus the pulley, and order the remanufactured pump only if the reservoir can be reused. If the reservoir can not be used, order an exchange remanufactured pump assembly.(www.larescorp.com)
Pump Assembly
Lubricate all parts with power steering fluid before assembly. Install the pump shaft oil seal using a 15/16″ socket to drive it into place until it bottoms on the bore shoulder. Lubricate the O-rings that fit into the housing, and install them. Place the shaft, splined end up, in a soft jawed vise. Install thrust plate on the shaft with the smooth, ported side up. Slide the rotor and the counter bore down over splines. Install the new rotor snap ring. Make sure it is in the groove. Install the 2 dowel pins into the holes in the pump housing. Insert the shaft, the rotor and thrust plate assembly into the housing. Align the locating holes with the dowel pins. Slide the pump ring over the rotor and onto the dowel pins with the arrow on the ring facing toward rear of the housing. Install the vanes in the rotor slots with the radius edge facing out toward the pump ring inner surface. Position the pressure plate on the dowel pins with the circular spring depression facing the rear of the housing. Using a 1 1/4″ socket in the groove of the pressure plate and press down on the socket with both thumbs to seat the assembly on the O-ring in the pump housing. Place the spring in the groove in the pressure plate. Place the end plate lip edge over the spring. Using thumbs press the end plate down below the retaining ring groove. While holding the end plate down, evenly seat the retaining ring in the groove. Use a punch, and tap the retaining ring ends around in the groove until the opening is opposite the flow control valve bore. This ensures the maximum retention of the retaining ring. Install the body to the reservoir O-ring. Position the magnet, if used (NOS GM 5692682). Install the O-rings to the reservoir mounting studs and the flow control valve. Place the reservoir on the pump body, and align the mounting stud holes. Install the studs. Do not pull the reservoir onto the pump using the studs because the reservoir can bend and cause leakage. Using a soft faced hammer tap the reservoir down on the pump. Check that the O-rings are in place. Tighten the studs. Install the flow control valve spring and the flow control valve with the end cap toward the spring. Install the O-ring on the pressure hose fitting upper most groove. The lower groove will restrict relief outlet orifice. Torque to 30-35 foot pounds. Install the pulley. Torque the pulley nut to 60 foot pounds.Install the pump into the vehicle. Start the pressure hose fitting by hand, and then tighten it with a flare wrench. Do not cross thread the fitting. Connect the return hose. Install the belt(s), and tighten to manufacturer’s specifications. A belt that is over tightened will cause premature belt failure. If the system does not have fresh fluid in it, do not connect the return hose. You will have to flush the system with fresh fluid, and then bleed the system. Connect the battery. Raise the front of the vehicle on safety stands. Get a buddy to help you as the steering wheel has to be turned gently from lock to lock position. Start the engine, and add fresh fluid until the return line spouts fresh fluid. Connect the return line. Bleed the system. If the system was charged with fresh power steering fluid during a previous test, fill the reservoir with fresh fluid, and bleed the system.
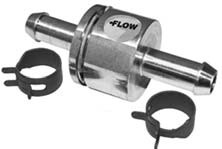
Installing a Filter

Happy motoring.
Originally printed in Skinned Knuckles magazine, and copyrighted by SK Publishing/Skinned Knuckles Magazine. Reprinting of any portion prohibited without written permission of SK Publishing, PO Box 6983, Huntington Beach, CA 92615.Subscriptions to Skinned Knuckles magazine is $28.00 for twelve monthly issues (within the U.S.). Contact Skinned Knuckles by mail at PO Box 6983, Huntington Beach, CA 92615; Website topqa.info and click on Subscribe or PayPal. E-mail [email protected], phone: 714-963-1558.
Last, Wallx.net sent you details about the topic “How To Rebuild A Power Steering Pump❤️️”.Hope with useful information that the article “How To Rebuild A Power Steering Pump” It will help readers to be more interested in “How To Rebuild A Power Steering Pump [ ❤️️❤️️ ]”.
Posts “How To Rebuild A Power Steering Pump” posted by on 2021-09-17 18:11:08. Thank you for reading the article at wallx.net


