How to make a tsunami cake
Video How to make a tsunami cakeObserve Juliet Sear’s step-by-step information on how one can make a tsunami cake. From funfetti sponge to double cream icing, uncover every part you must find out about making a tsunami cake.We’ve teamed up with baking knowledgeable and best-selling cookbook creator Juliet Sear to create the newest meals pattern – a tsunami cake. It’s referred to as a tsunami cake, because the icing is held in place on the high of the cake with acetate, wrapped across the exterior of the cake. The concept is to rigorously and slowly raise the acetate up, permitting the icing to cascade in a ‘tsunami effect’ down the perimeters of the cake.Reading: How to make a tsunami cakeAlso referred to as a ‘pull-me-up cake’, a tsunami cake is the newest showstopping cake pattern to go viral. When you like a baking problem and have already tried making a drip cake, cleverly hidden form cupcakes, or a layered rainbow cake, you might need to add this masterpiece to your record.In our unique video, Juliet talks you thru every step of the method – and we’ve additionally outlined the strategy under. Juliet, who can also be an everyday on ITV’s This Morning, says, “The great thing about a tsunami cake is that it bring theatre to the table. It’s all about movement.”
Watch our step-by-step video on how one can make a tsunami cake
Contents
On this article, we have a look at the next phases of constructing a tsunami cake:Do you want particular gear to make a tsunami cake? How to make a tsunami cake The tsunami cake sponge How to make the buttercream frosting Assembling the tsunami cake Tsunami cake icing How to disclose a tsunami cake Storing leftover tsunami cake
Do you want particular gear to make a tsunami cake?
An important piece of apparatus wanted to make a tsunami cake is acetate. Juliet says; “The idea is that you build your cake wrapped in the acetate, as shown above. You wrap the sponge tightly so that you can pour the icing on and then you just lift it up which allows the icing to flow all at once.”Juliet makes use of a 20cm excessive acetate however says, “If you can’t find the tall ones, you can just sellotape two pieces of acetate together so if you want to make something really nice and tall.”To make a tsunami cake Juliet has used the next:
- A medium crank deal with palette knife for frosting
- Piping baggage
- Cake leveler or massive bread knife – we suggest Tala cake leveler
- 6” spherical skinny cake card to chop round and use as a base
- Giant lipped cake plate or stand
- Acetate to wrap across the cake, 20cm excessive – we suggest Cake Collars, accessible in several sizes
- 7” spherical cake tin/s
- Sellotape
- Scissors
- Baking parchment
How to make a tsunami cake
Earlier than you begin making your tsunami cake be sure to have every part you want out in entrance of you. It’s finest to create this cake in phases. Begin with the sponges first. Go away them to chill fully after which you may transfer onto the buttercream. As soon as the buttercream is prepared and in piping baggage, you may transfer onto making the tsunami cake frosting and assembling.Start by preheating the oven to 180 levels fan. Additionally, you will have to grease, base, and sideline 4 x 7” spherical cake tins (or do in batches when you do not need a number of tins)
The 1st step: How to make the tsunami cake sponge
Juliet has used her funfetti sponge recipe for the cake, with added sprinkles. That is good when you’re selecting to make this cake for a special day, and provides an additional ‘wow’ issue in the case of chopping. You can make this with readymade, shop-bought sponges as an alternative when you’re in need of time – and you possibly can additionally experiment with completely different flavours too, like a chocolate sponge cake base, lemon drizzle, or perhaps a marble cake.Elements for the tsunami cake sponge:
- 400g smooth salted butter, at room temp
- 2 tsp vanilla bean paste or extract
- 400g caster sugar
- 8 medium free-range eggs
- 400g self-raising flour with 1 tsp baking powder whisked into it
- 4 tablespoons shiny bake steady cake sprinkles
Technique for the tsunami cake sponge:1. In a stand mixer bowl with a paddle beater attachment or a big bowl utilizing a hand whisk, beat the butter, vanilla, and sugar on quick pace till actually mild, pale, and creamy. Cease the mixer and scrape the bowl down as wanted all through.2. Add the eggs, one by one, and beat till mixed at a sluggish pace. Add the flour and baking powder in increments of three, beating very slowly till solely simply blended.3. Throw within the sprinkles and blend by means of gentlyRead more: How to make cake pops with a cake pop maker4. Divide the batter equally into the tins and bake for round 20-25 minutes till the sponges are springy, flippantly golden, and cooked within the centre fully.5. Go away to chill within the tin for five minutes, then end up onto a cooling rack, take away the paper and permit to chill. Whereas the desserts are cooling make your frosting.
Step two: How to make the buttercream frosting
 For the buttercream, Juliet Sear has chosen a candy strawberry buttercream, which is made utilizing strawberry jam and flavouring. She has additionally used a refined vanilla buttercream too, which creates a formidable end to your cake as soon as minimize. The buttercream sandwiches the cake layers collectively firmly. As soon as the buttercream is about it ought to preserve the cake regular, so it is going to stay in place as soon as the acetate is eliminated.“I’ve put the buttercream into a piping bag as it makes it easier to get into the acetate as the acetate is quite tall. And you’ll get a much neater finish,” says Juliet. “I’ve gone for a 1cm thick layer of buttercream so you can really see the defined layers.”Elements for the buttercream frosting:
- 300g smooth unsalted butter
- 2 tsp vanilla bean paste
- 900g superfine icing sugar, sifted
- 2 tablespoons strawberry jam, sieved
- 2 tsp strawberry flavouring
- Yellow and pink meals colouring
Technique for the buttercream frosting:1. Place the butter and vanilla in your stand mixer bowl with the paddle beater or use a bowl with a hand whisk and beat on excessive till very creamy and easy, for a minute or so2. Steadily add the icing sugar, a couple of quarter at a time, beating every addition on sluggish first so the icing sugar doesn’t puff up in every single place, as soon as mixed flip to excessive pace for a minute or so every time. Juliet says; “A good tip to ensure your buttercream is creamy and fluffy – add a tablespoon of recently boiled water into the bowl with each addition of the sugar, mix it on slow then turn up to high.”3. Take 400g of the frosting and tint it a lightweight yellow color and place it in a big piping bag4. With the remaining frosting, add within the jam, flavouring, and colouring and beat by means of, place into your piping baggage.
Step three: How to assemble a tsunami cake
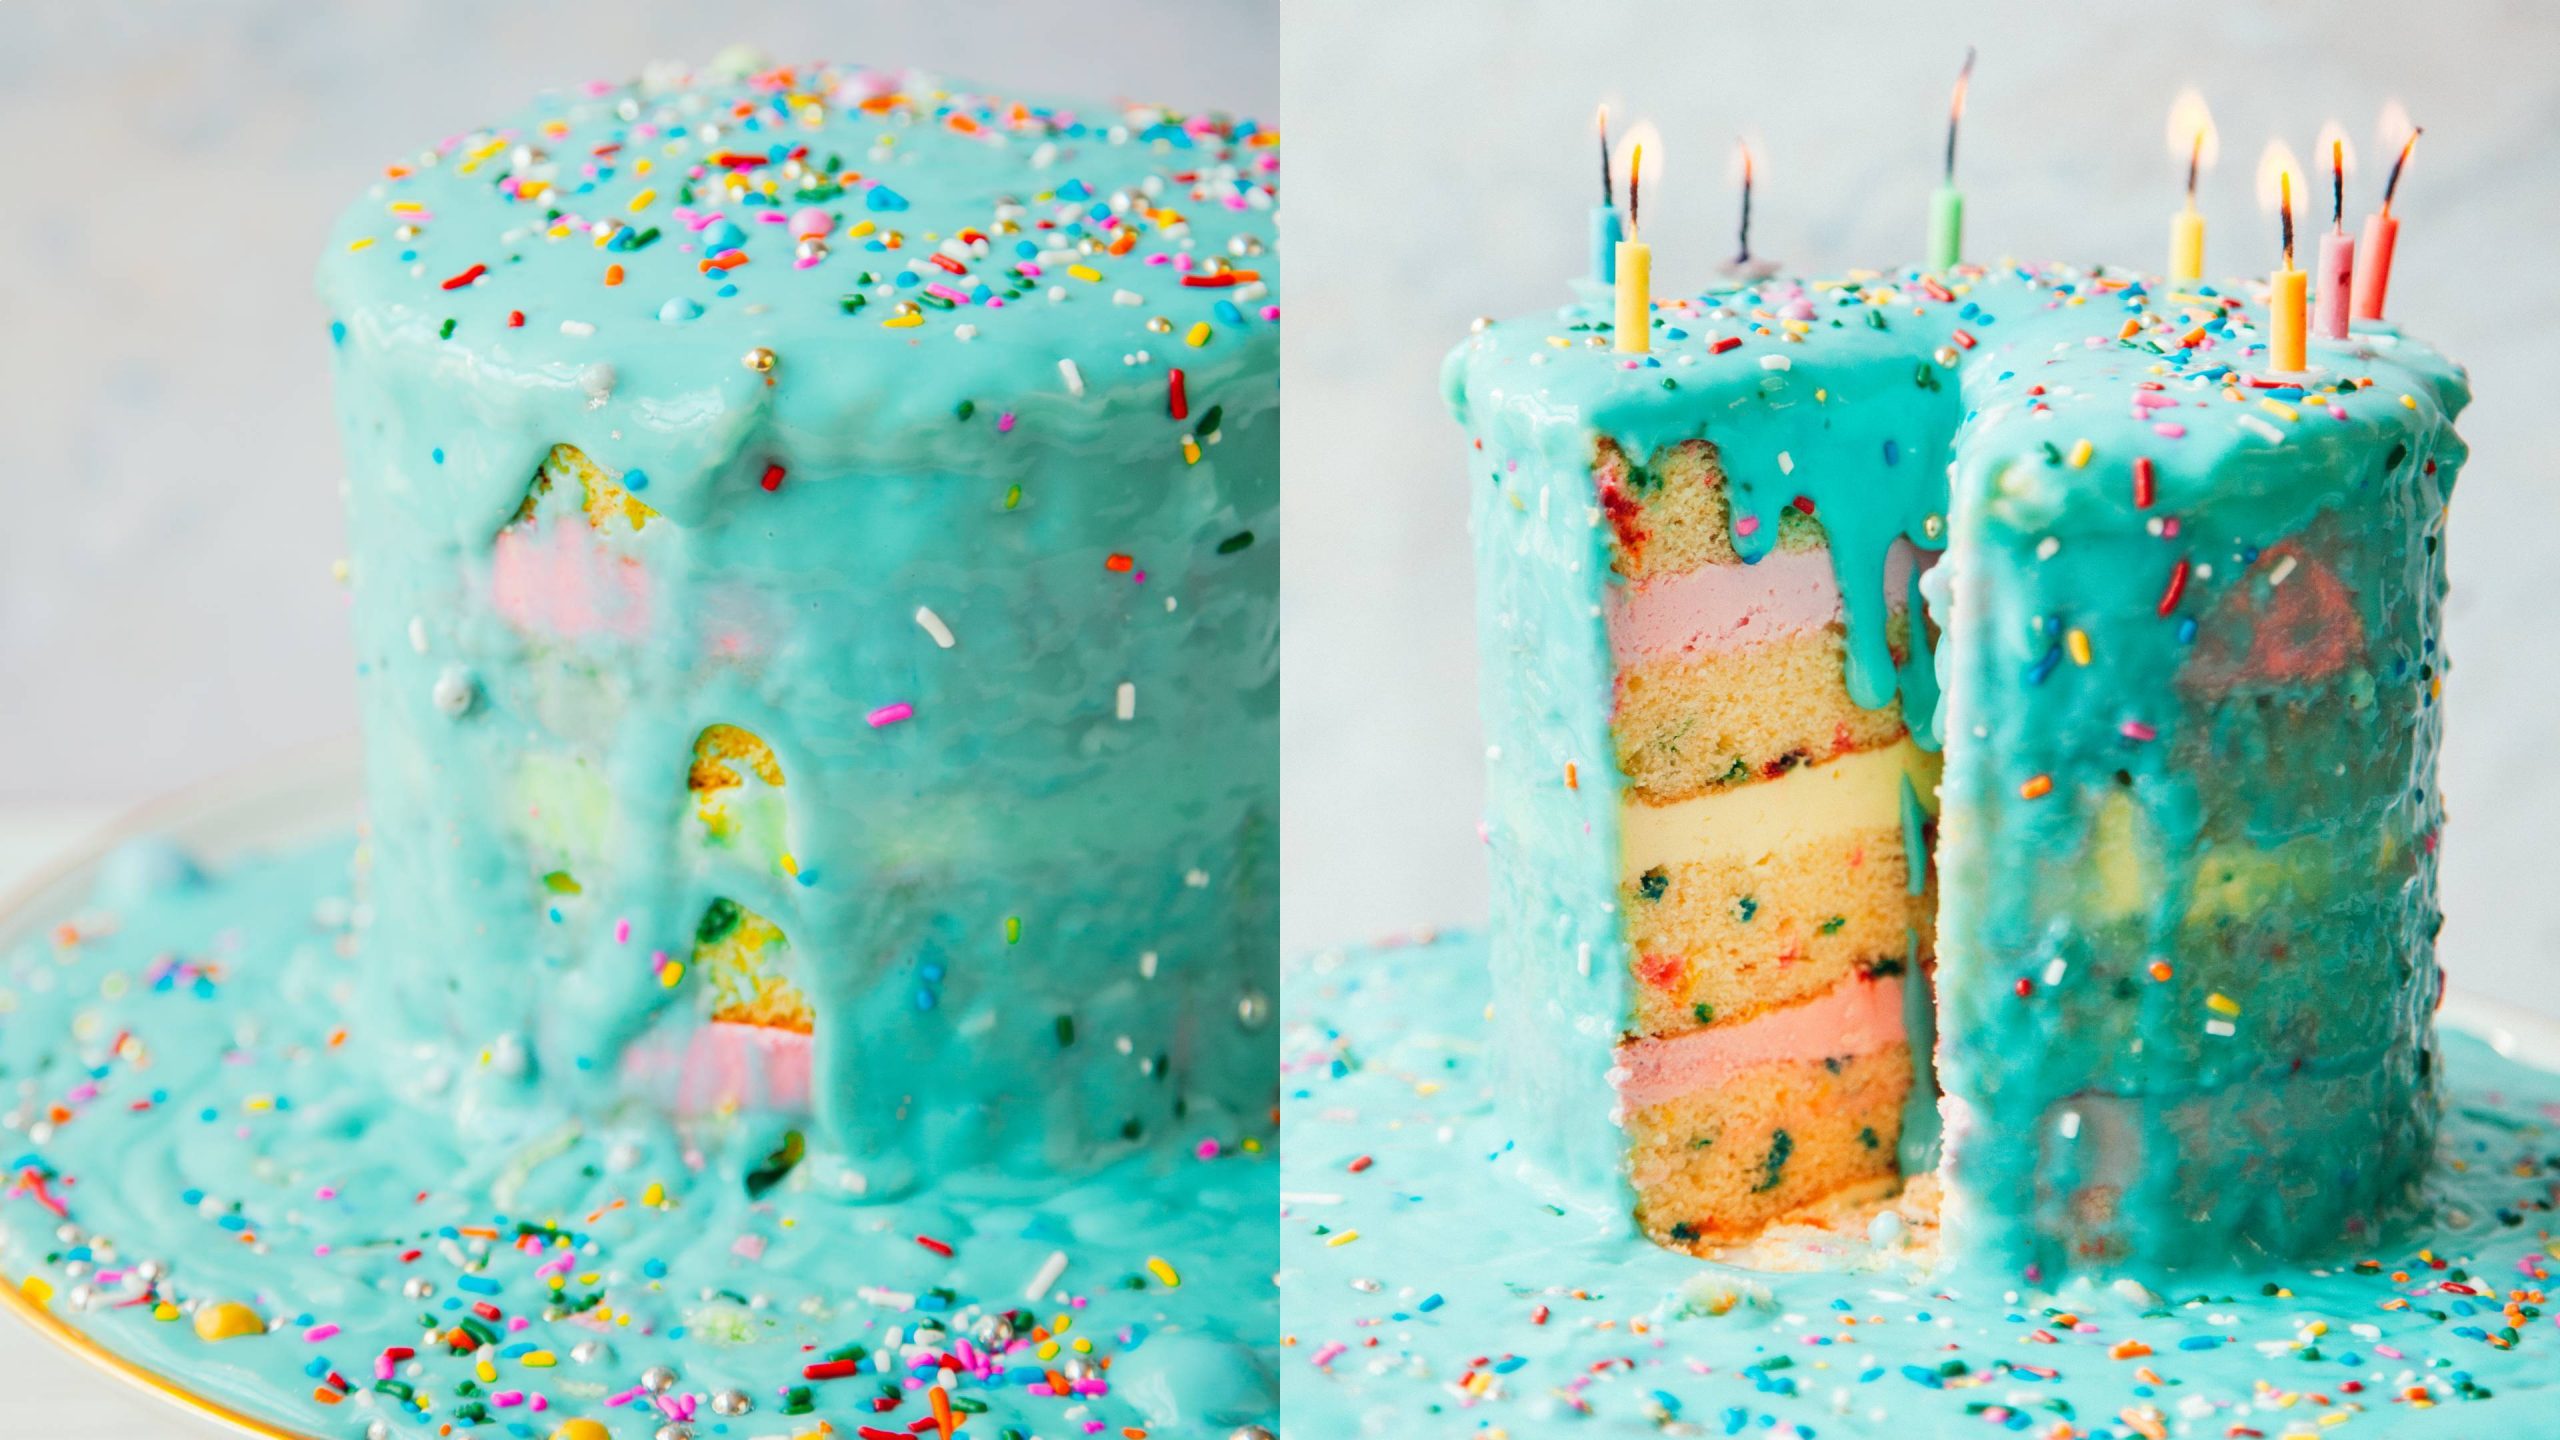 The primary factor to remember when assembling a tsunami cake is that the perimeters of the sponge cake and the perimeters of the buttercream contact the acetate fully all the best way across the cake. This may kind a barrier to cease any of the tsunami icing seeping by means of the cake or down the perimeters whenever you don’t need it to.Urgent the sponges down firmly when assembling and placing the cake within the fridge to chill can even assist to stop this from occurring as Juliet discusses under.Technique for assembling a tsunami cake:1. Degree off any uneven humps from the highest of every cake to make flat with a cake leveler or bread knife. Minimize a spherical 6” disc from every cake to trim off the crust in order that the cake sprinkles could be seen within the sponges. You’ll have a complete of 4 layers now to sandwich collectively.2. Place your first layer onto your stand, board, or plate and unfold over a thick layer of strawberry frosting. Add a second layer of cake and press gently. Now wrap across the acetate ensuring it’s tight and neatly secured in opposition to the perimeters of the desserts. Press the sponge down now firmly, to push the frosting up in opposition to the acetate. “Press the cake firmly so it really attaches to the slides of the acetate,” says Juliet.3. Now construct up with a layer of yellow frosting saving slightly for the highest and add the third sponge.4. Add one other layer of strawberry frosting and high with the final sponge, inverting it so the sleek half is uppermost. Go excessive with a skinny overlaying of vanilla frosting to seal over and create a barrier to carry again the tsunami icing.“Adding a thin layer of buttercream on top seals all the edges. Make sure all of the buttercream is touching the acetate so when we pour on the tsunami icing it’s not going to start drizzling down the side. It can trap it, ready for the big reveal.” says Juliet.5. Chill within the fridge for about 30 minutes to an hour or till agency. In the meantime, make the tsunami icing.
Step 4: How to make the tsunami cake icing
Read more: How to bake taco shells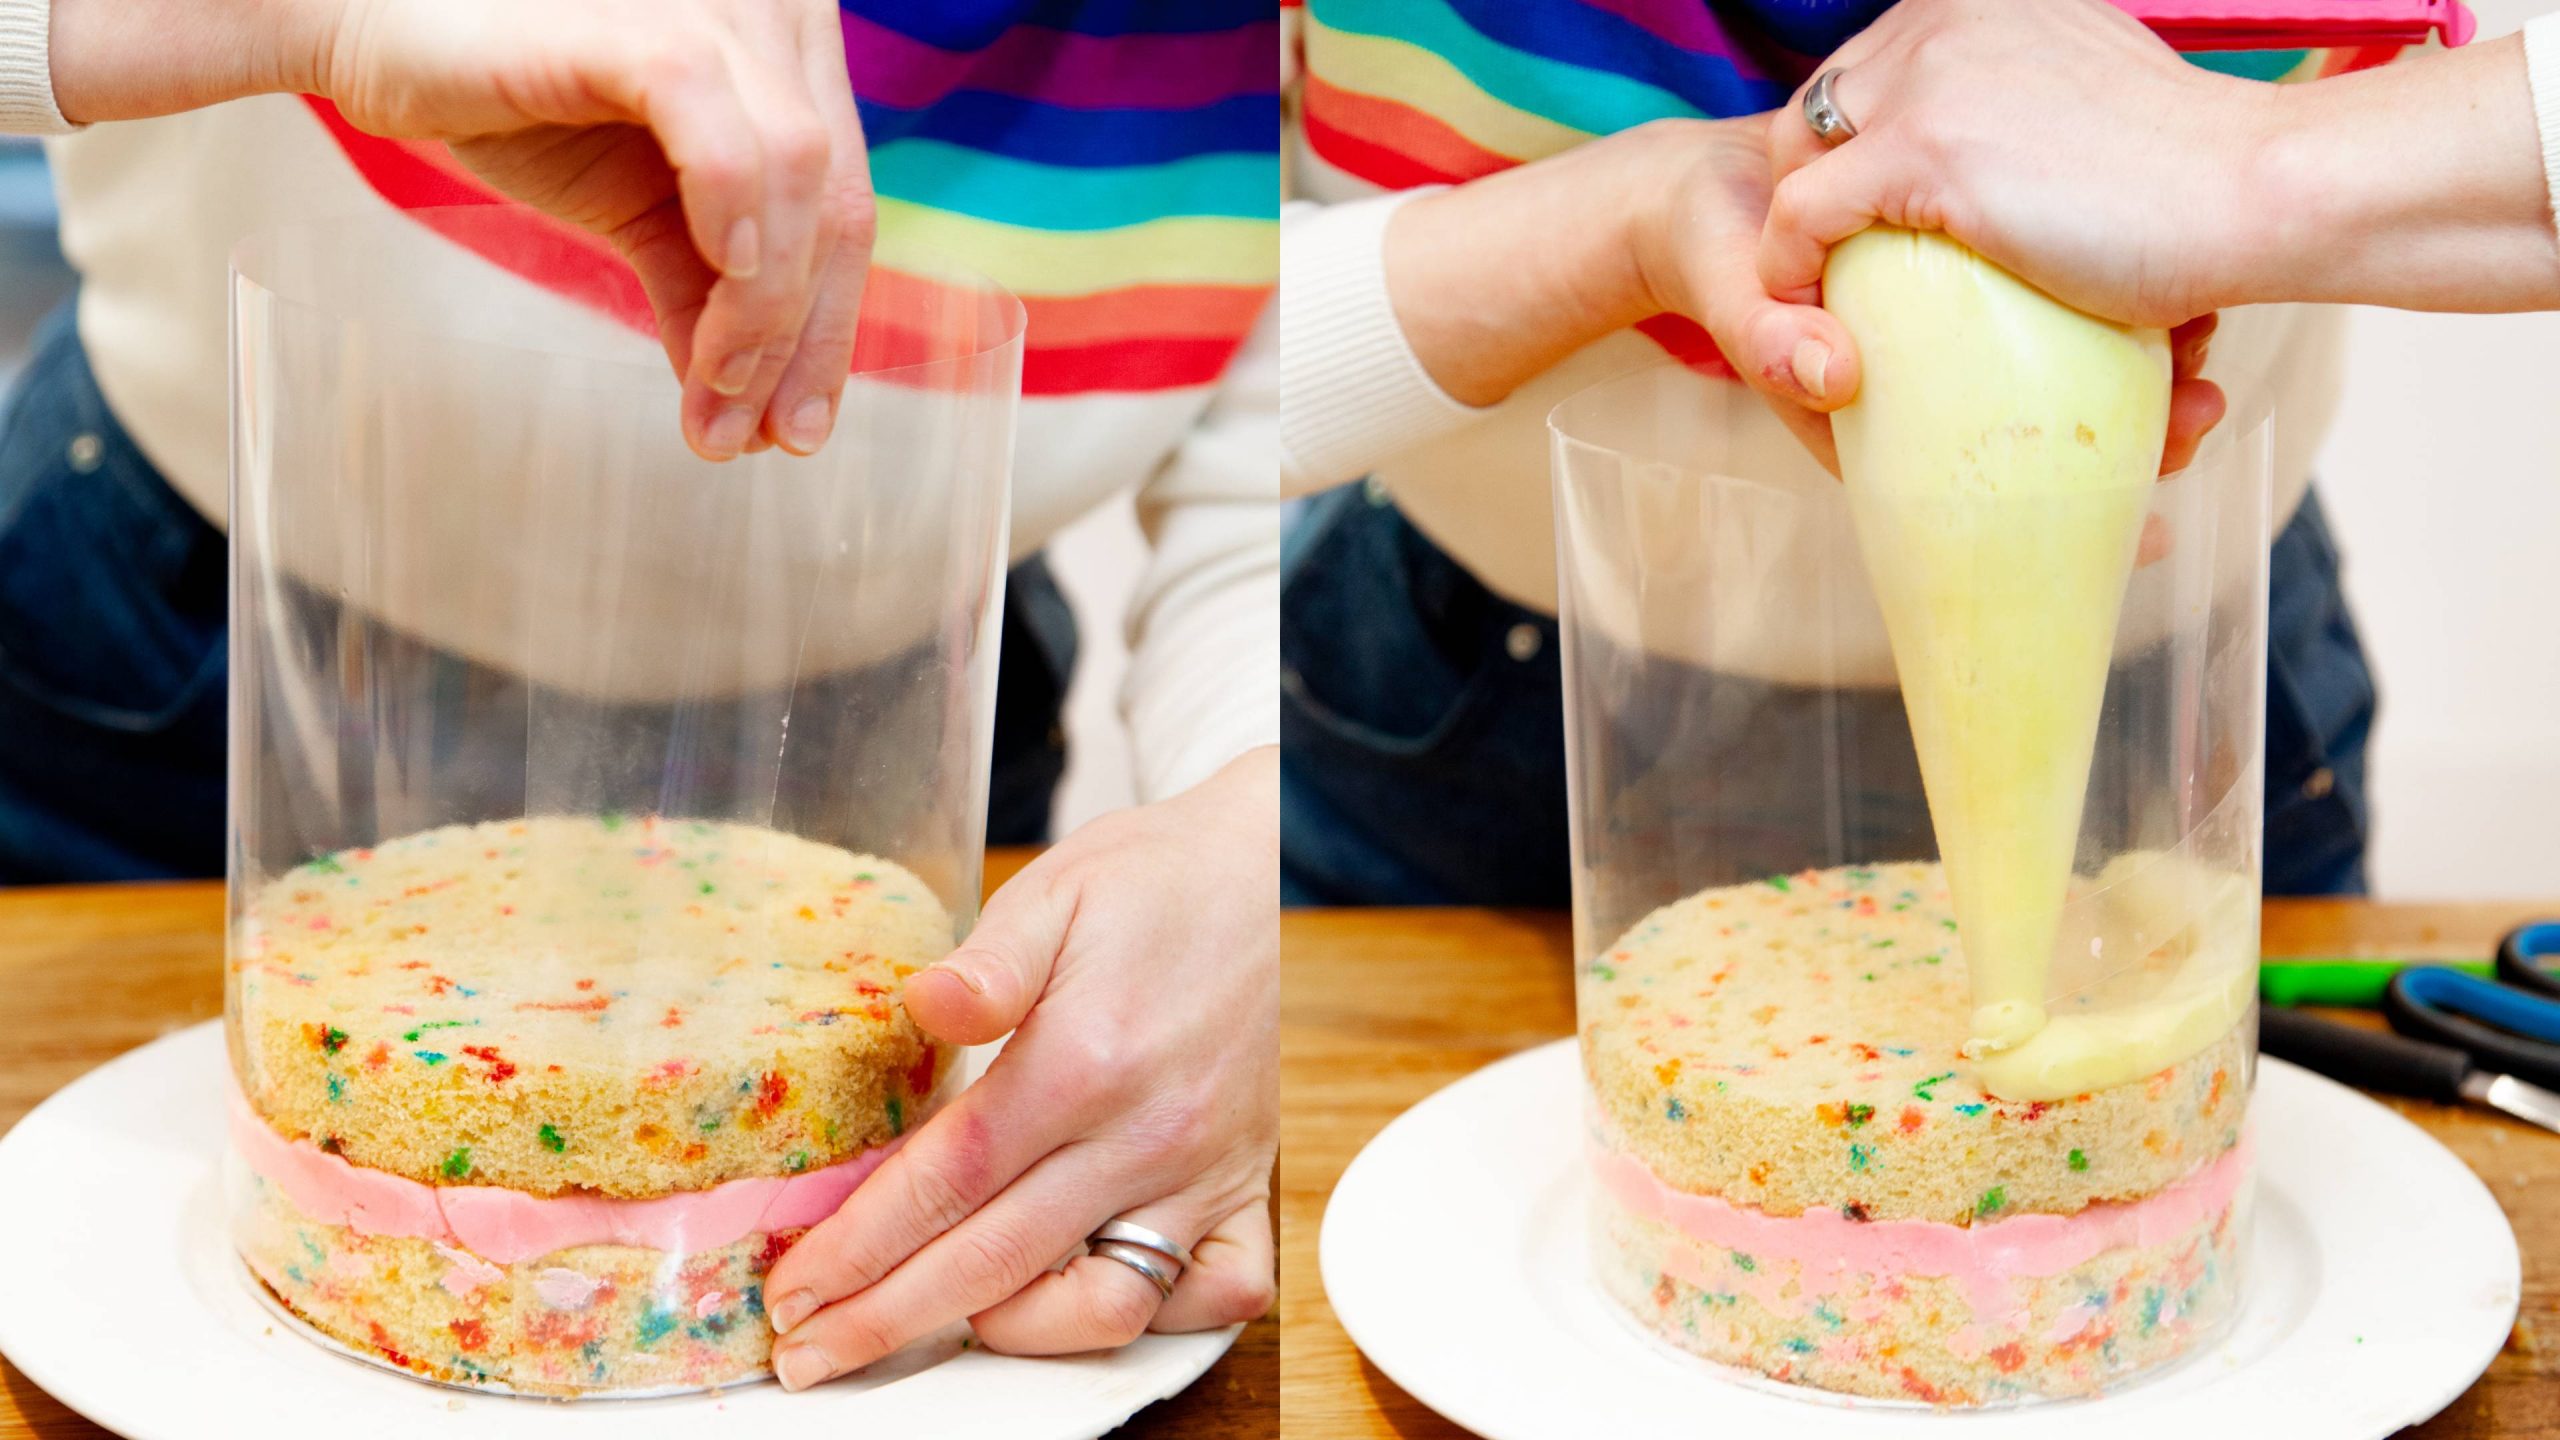 For the tsunami icing, Juliet has opted for a pale blue meals colouring, which makes this cake an actual showstopper. The tsunami cake frosting or icing is without doubt one of the most necessary components of the cake. This must be accomplished exactly with the intention to get the perfect reveal and ‘ooze’ impact.The double cream makes the icing luxurious and creamy. The cornflour and condensed milk thicken the icing to verify it’s not too runny in any other case it is going to seep by means of the cake or slide off fully. “The idea with this is you need it to be thick enough to cling to the cake as it cascades down it and not too thin so it just runs off.”Elements for the tsunami icing:
- 350g double cream
- 350ml semi-skimmed milk plus an additional 35-40ml for making the cornflour resolution
- 35g cornflour
- 1 can condensed milk
- Blue meals colouring
- Sprinkles and gold and silver balls
Technique for the tsunami icing:1. To begin with, make the cornflour right into a liquid/paste by including about 35-540 ml milk into it, combine with a spoon, this can forestall your icing from being lumpy.2. In a medium saucepan, whisk collectively the cream, milk, and cornflour combine over medium warmth, whisking continually till it begins to thicken. It should take about 6-7 minutes.3. Add within the can of condensed milk and whisk for an additional 20-30 seconds till it’s all come collectively, take away from warmth, whisk in slightly blue colouring, and place right into a bowl to chill fully. Place over a chunk of cling movie or parchment paper immediately onto the floor of the combination to stop pores and skin from forming.4. As soon as the combo is cool, you may pour it onto your cake. When you assume it appears to be like slightly lumpy you may sieve it first.
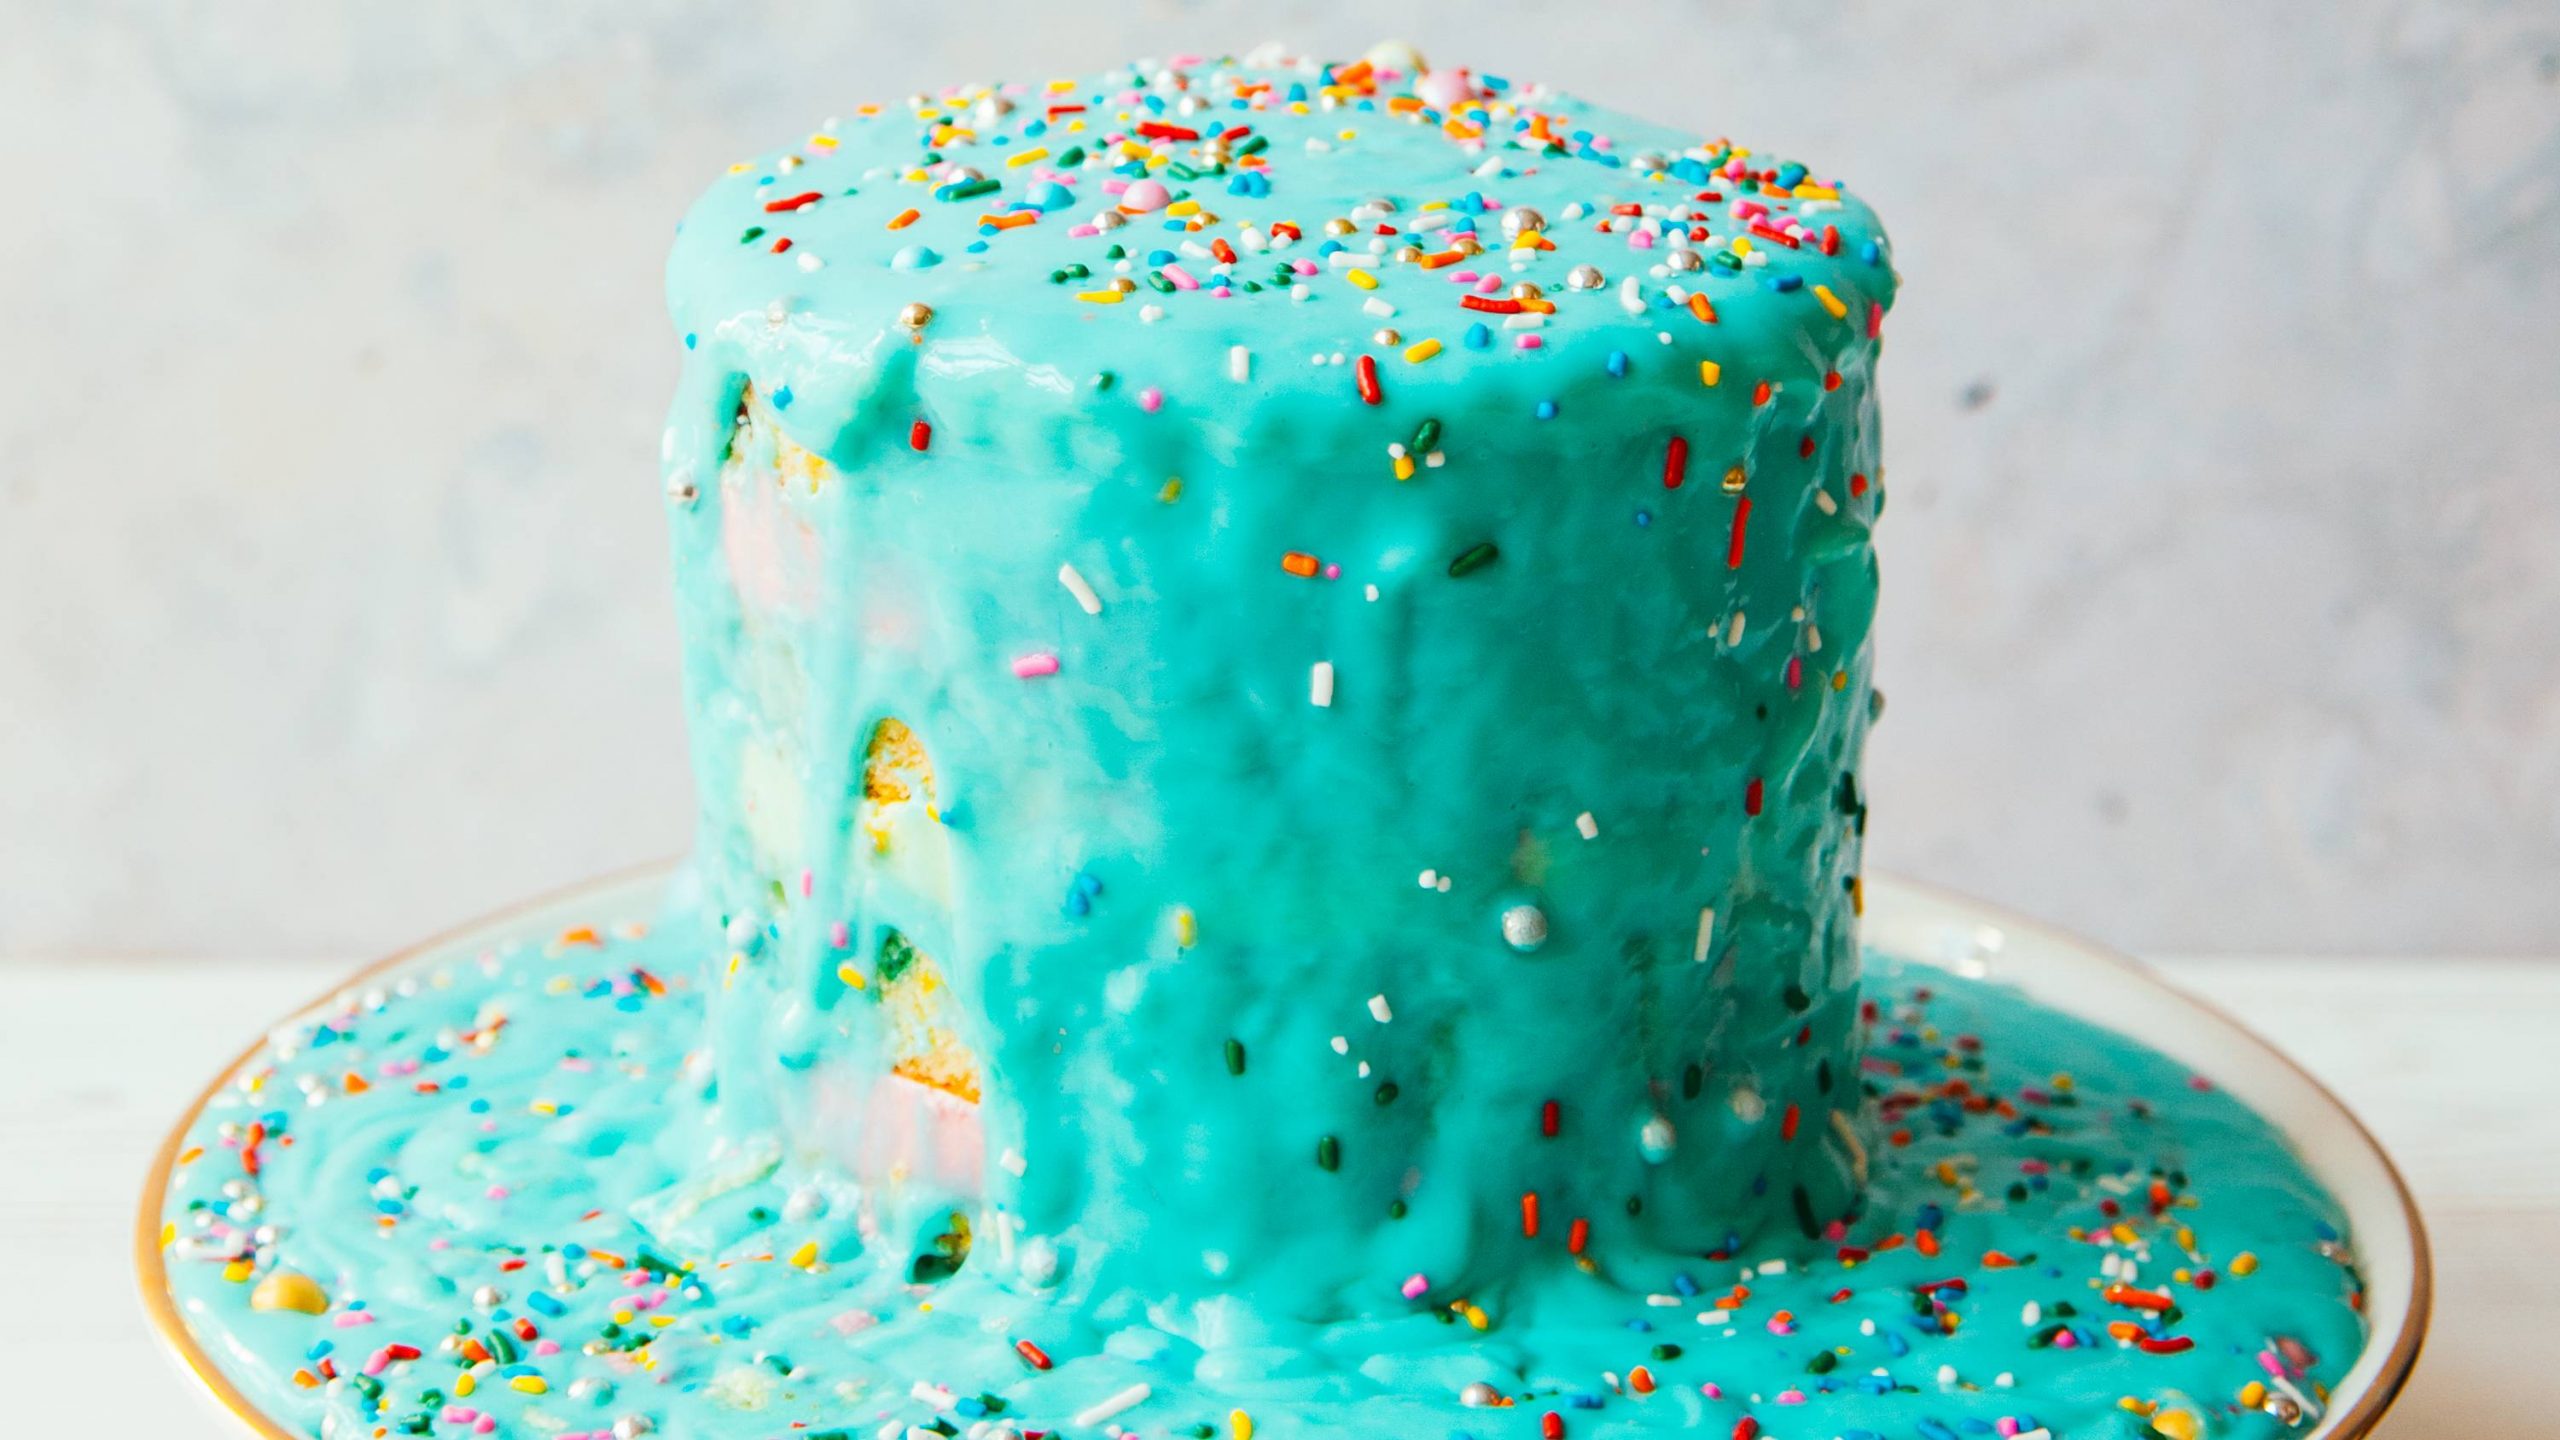
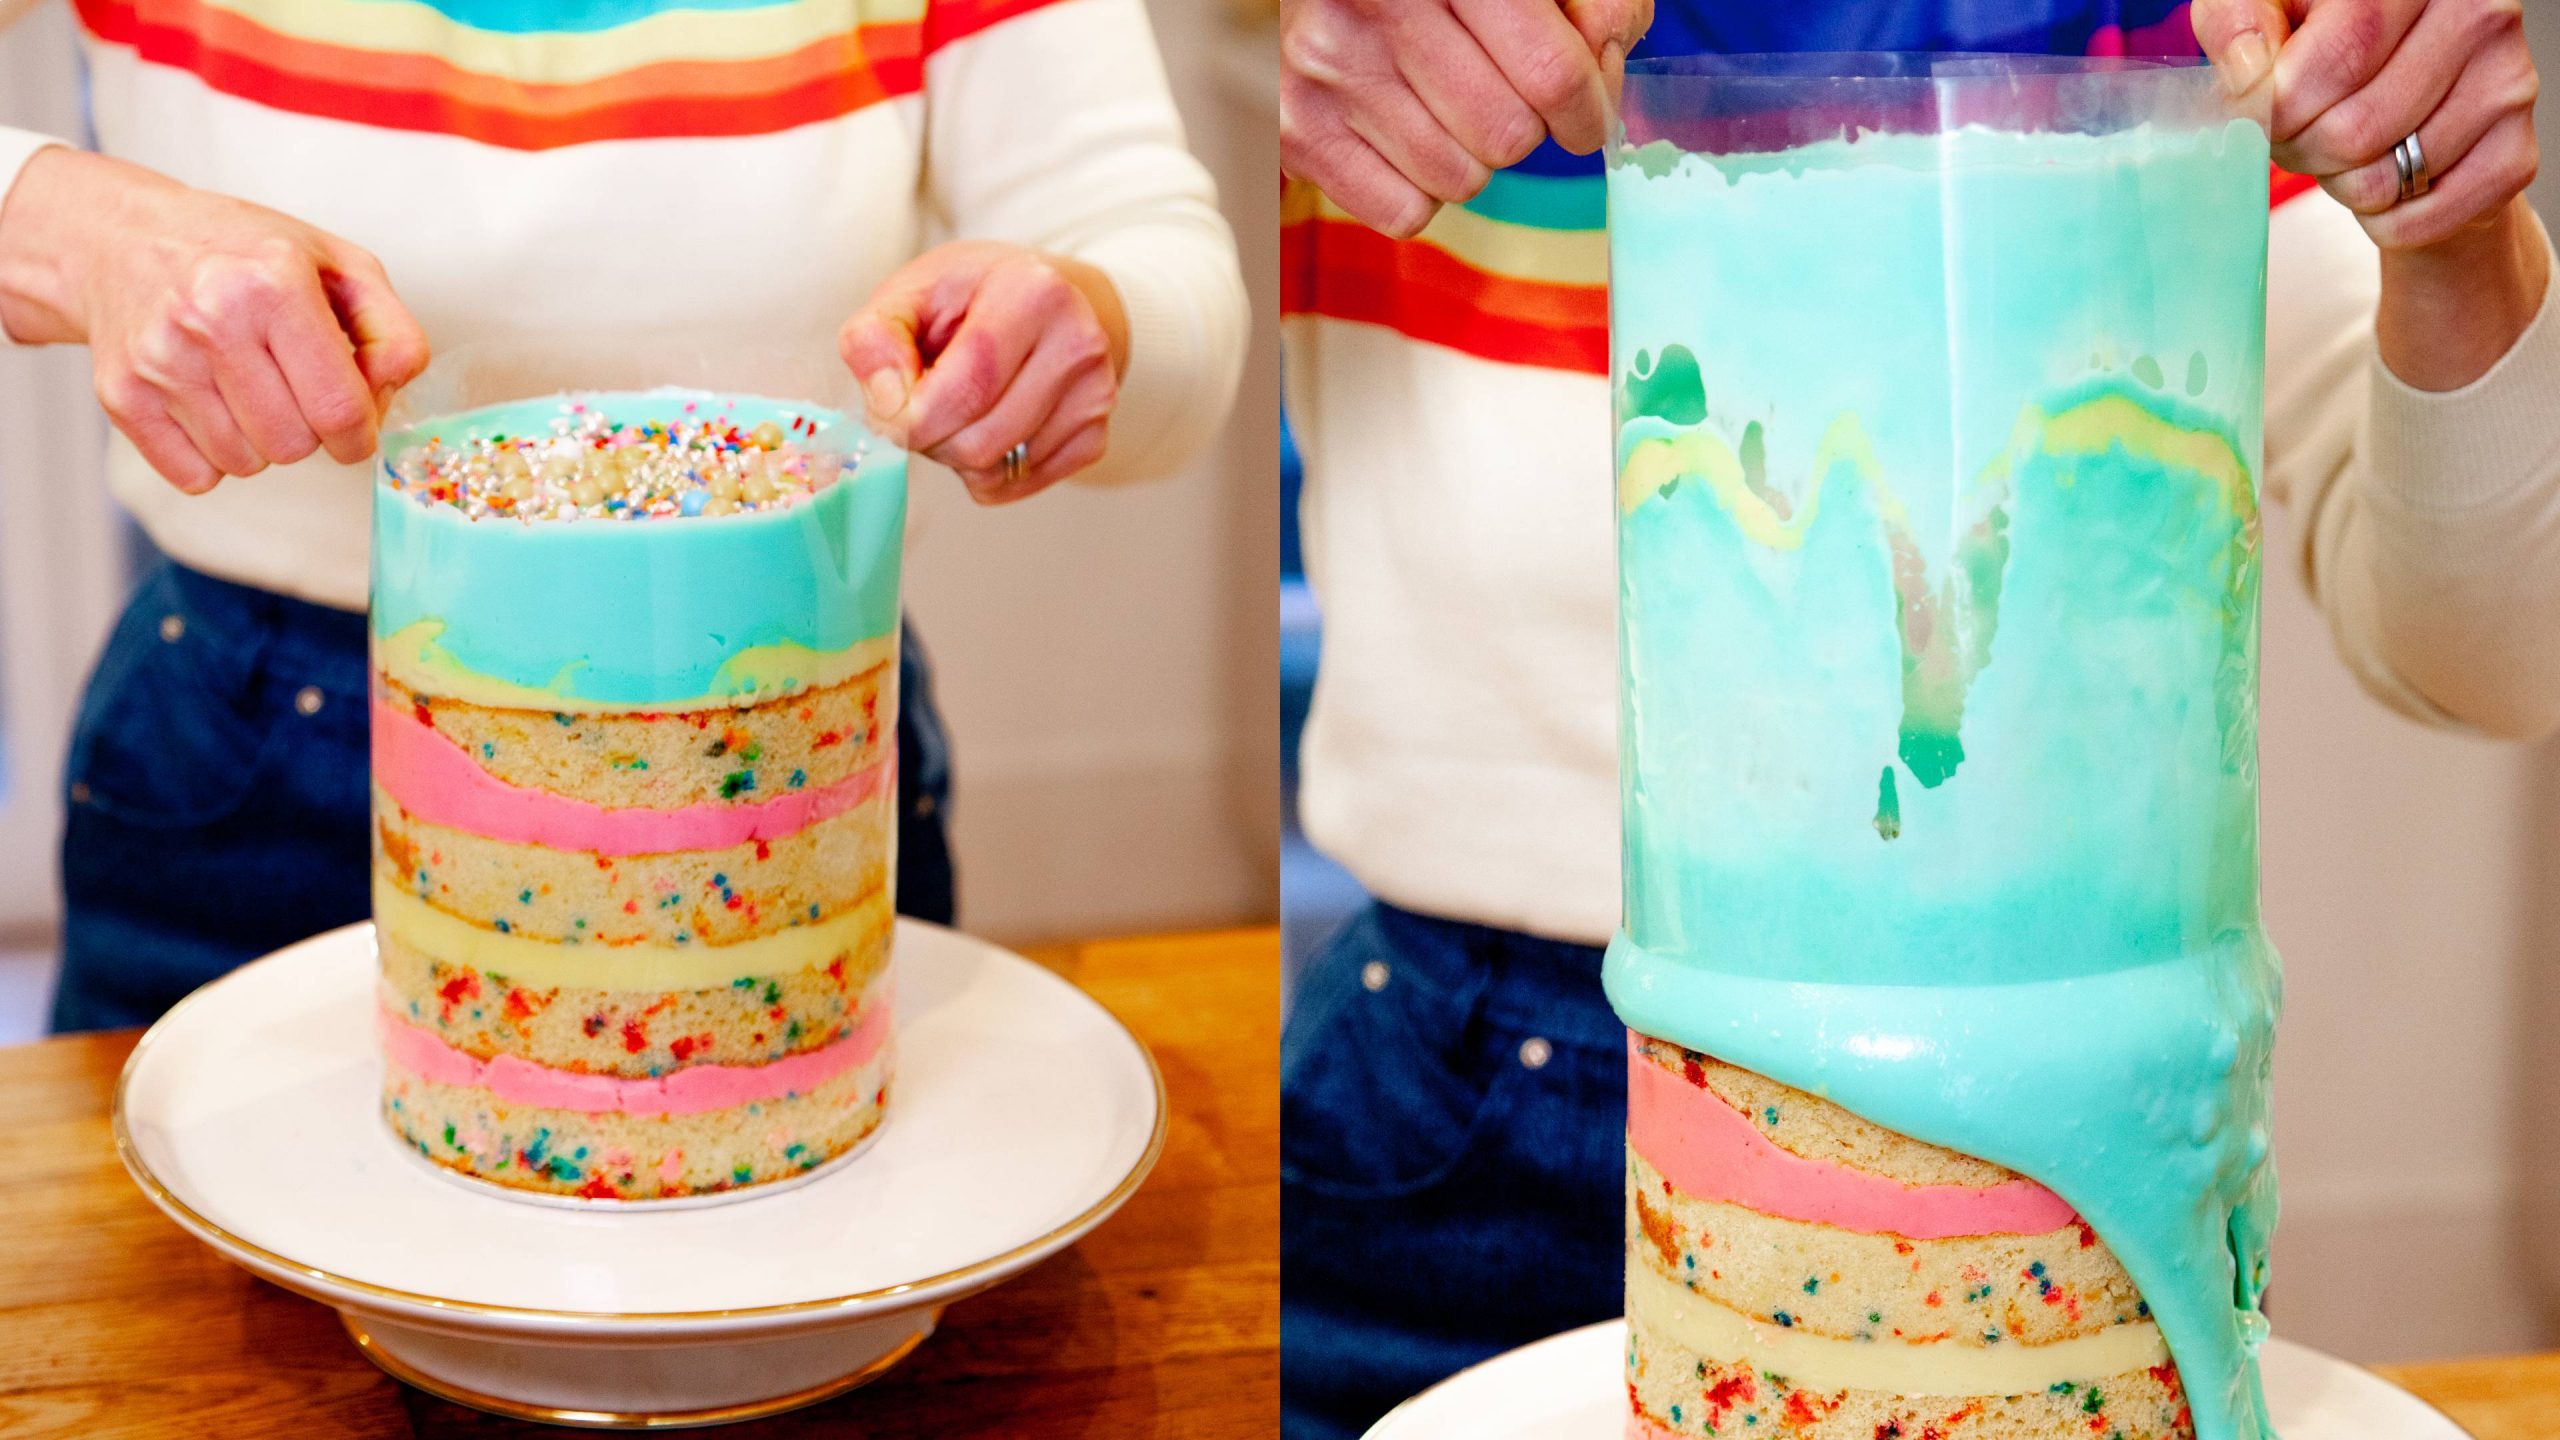
Step 5: How to disclose a tsunami cake
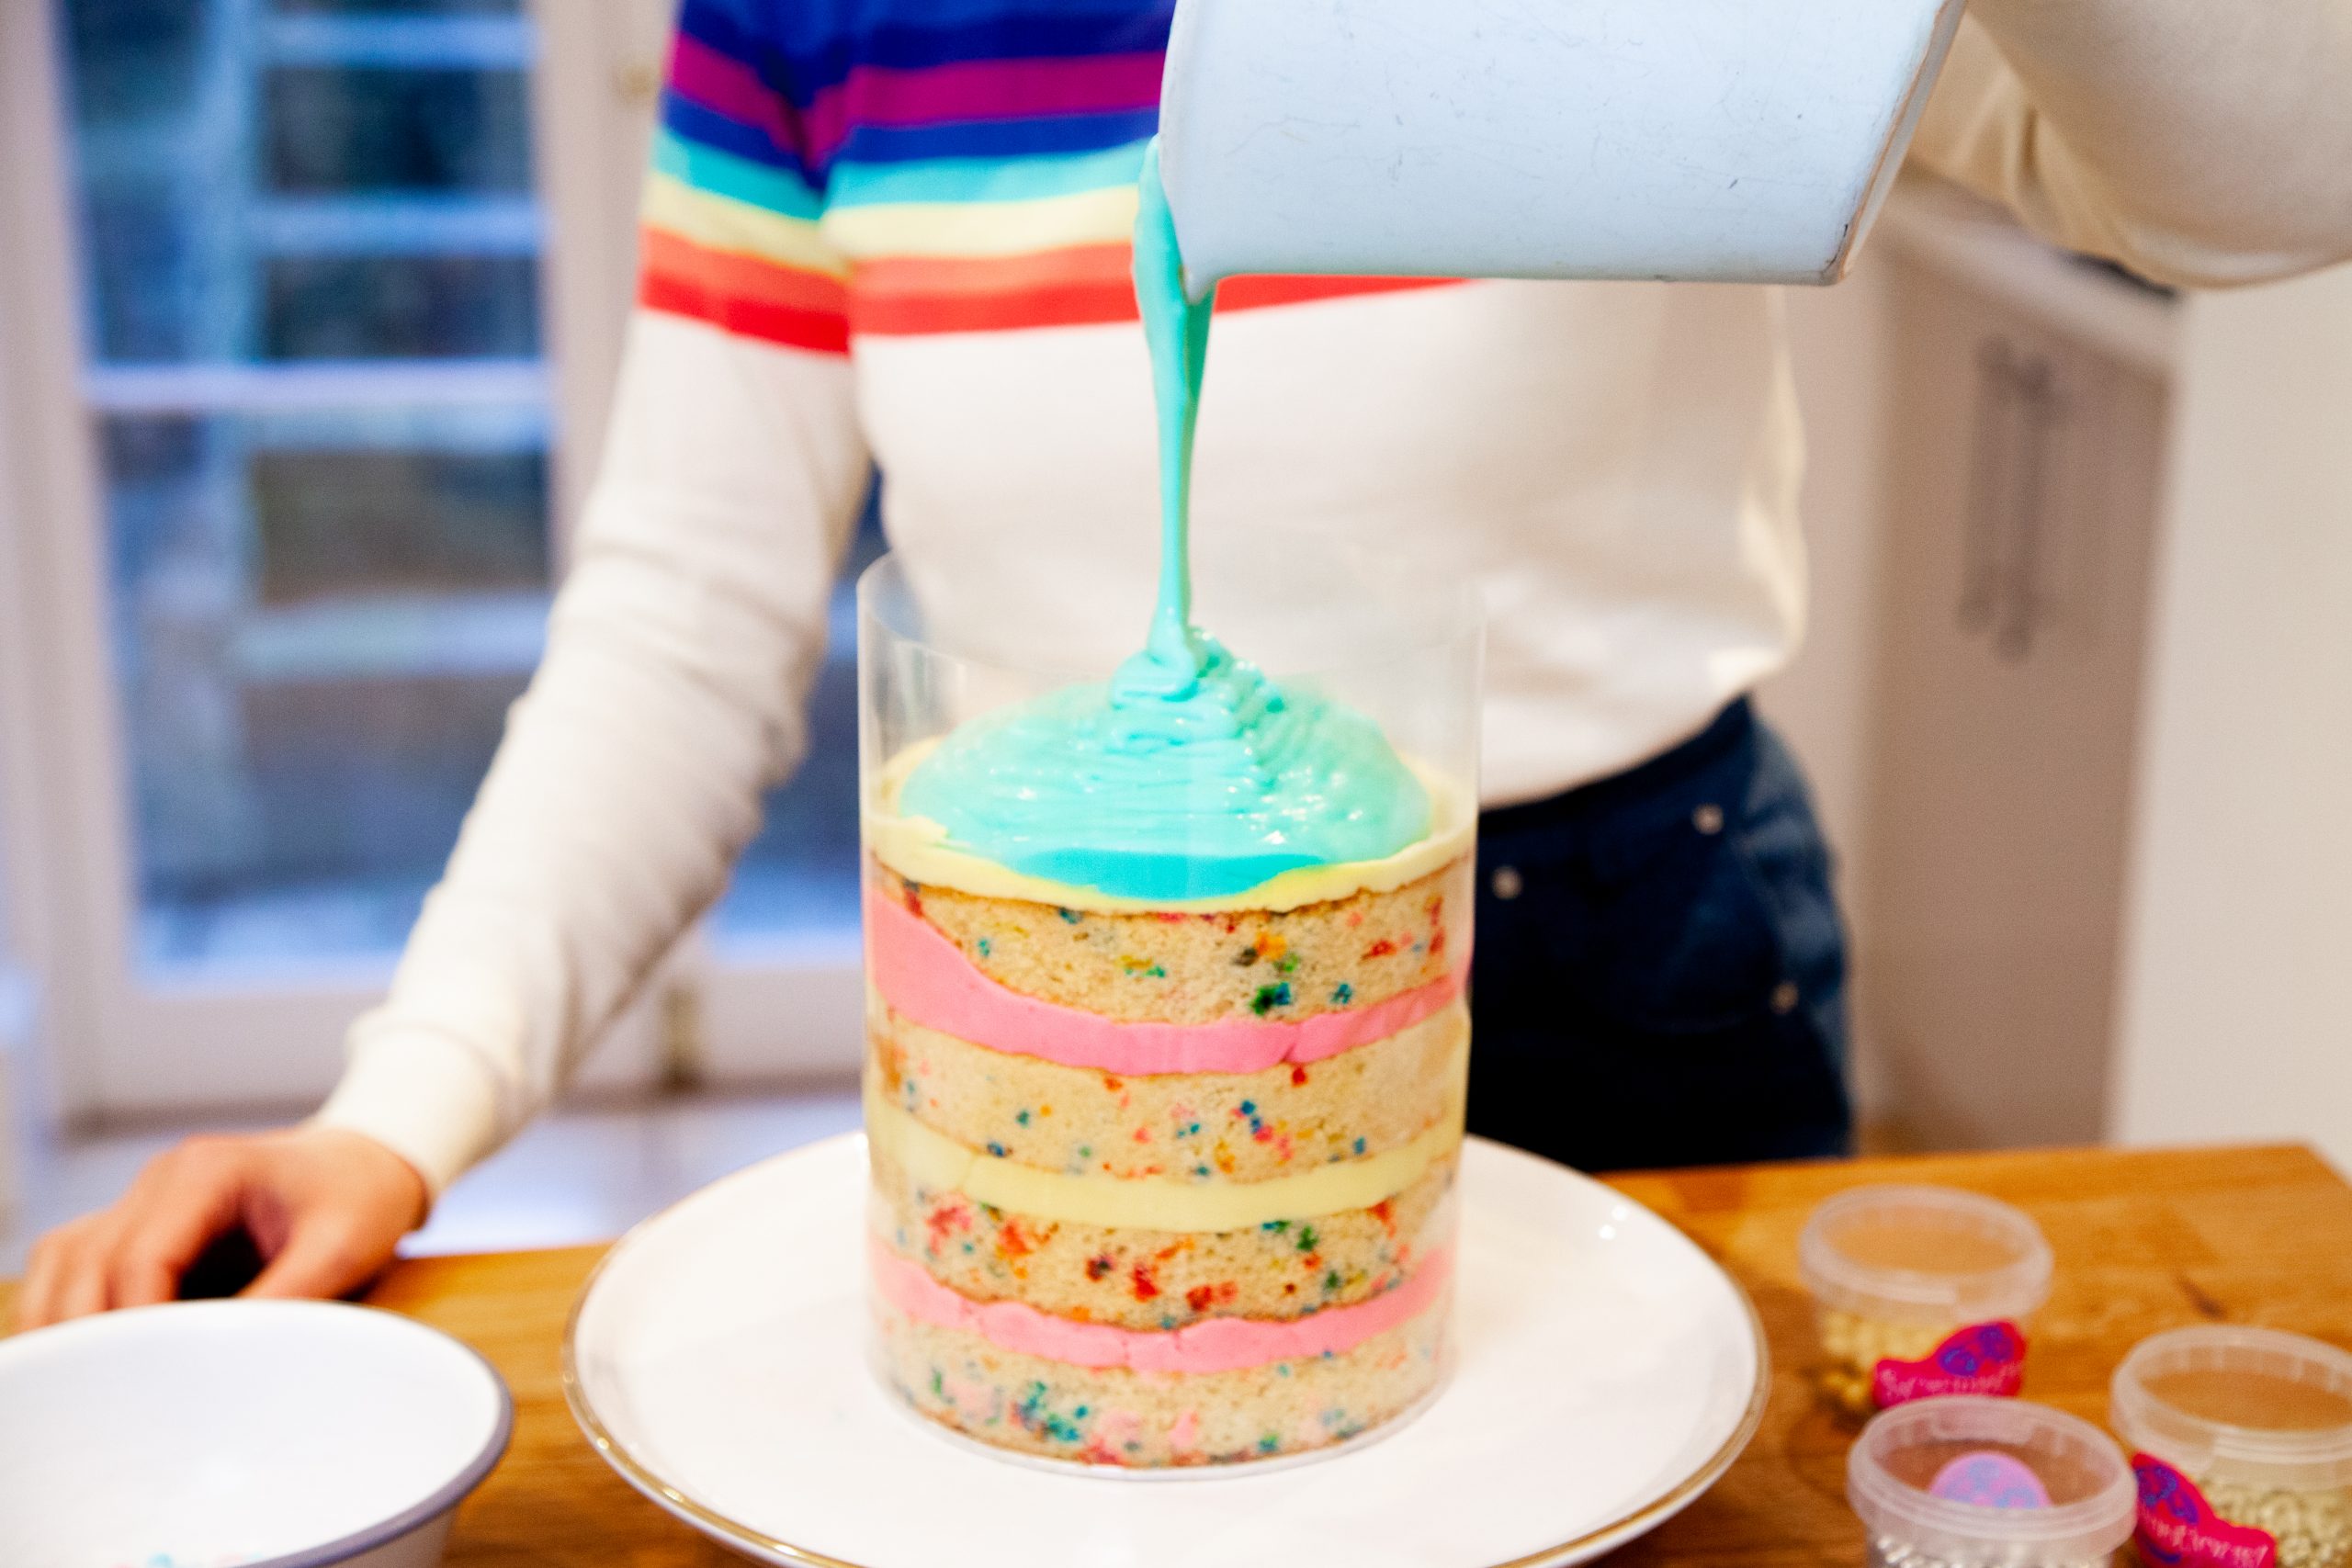 Revealing the tsunami cake is by far the perfect stage. Elevate the acetate slowly and steadily in an upwards movement. The icing will cascade down the perimeters of the cake making a tsunami impact.Be sure to have loads of edge across the cake so the icing can accumulate on the backside of the cake as an alternative of overlaying your desk or ending up on the ground. Juliet has chosen to current her tsunami cake on a big lipped cake stand.Technique for revealing a tsunami cake:1. Place the chilled cake onto your stand with loads of room for the icing that can spill over the perimeters. Pour the blue icing all around the high filling up to a couple inches within the acetate. Prime all of your sprinkles.2. Whenever you’re able to reveal the tsunami impact, gently loosen the acetate from the cake base, then pull upwards and permit the icing and sprinkles to cascade all down the perimeters of the cake.3. When you discover the acetate is tough to drag up after the cake has set and chilled, you may heat up across the exterior together with your palms or a hairdryer to melt the buttercream frosting on the skin so the acetate will pull up.Please word this recipe serves 20 (small parts) and can take round 1 hour to organize and 20-25 minutes to bake.
How to retailer leftover tsunami cake
 Ideally, a tsunami cake is made, revealed, and eaten on the identical day because it’s a really messy cake to retailer. However, in case you have any leftovers it’s finest to maintain this cake in parts within the fridge.Because the icing is made with double cream the fridge is the best choice to maintain the cake recent. It could dry the sponge out slightly so solely depart it within the fridge for as much as 2 days.If you wish to make this cake forward of time you possibly can prep and bake the sponge desserts prematurely. You can even make the buttercream prematurely too. Retailer it within the fridge after which deliver it to room temperature earlier than utilizing it once more.Juliet has created a pleasant Baking Membership neighborhood the place she shares all of her high ideas, tips, and particular strategies for bakers to study and hone their abilities. Every week visitors can be part of Juliet for a dwell bakealong in addition to accessing the entire earlier bakes, recipes, and demos.[apester id=”602cfabf06fa0e440799d1d8″]Read more: How to bake a butternut squash whole
Last, Wallx.net sent you details about the topic “How to make a tsunami cake❤️️”.Hope with useful information that the article “How to make a tsunami cake” It will help readers to be more interested in “How to make a tsunami cake [ ❤️️❤️️ ]”.
Posts “How to make a tsunami cake” posted by on 2022-01-05 03:20:15. Thank you for reading the article at wallx.net


