How To Make A Sphere From A Flat Sheet

(A new question of the week)A recent question asking how to make a sphere out of flat material called for a look at an old question on the same topic, and some new ideas, including thoughts about approximation. And we actually get to see the physical result of our assistance, which is rare!

Designing a leather sphere

Contents

Here is the question, from last November:Reading: how to make a sphere from a flat sheetCan anyone teach me how to determine the circumferences of different parallel slices or cross sections of a sphere? Like if you sliced an orange and restacked it — what is the circumference at every point the knife cut through. I know that at one point in school I did learn how to do that, but that was many, many years ago and when I try to look it up all of the results are about volume and surface area, neither of which I want.For context, I am designing patterns to sew differently sized leather bags. I want a large section of their bodies to mimic a spherical shape as that is pleasing to the eye. To draft my first prototype patterns it would be really helpful to be able to start with marking down mathematically determined points so that I have a good (hopefully spherical) base to start with and can then from there create a pattern that produces as close to the shape I want in the end product as possible without too many re-do’s at the sewing machine and less material waste.Thank you for your time, and any help you’re able to give.Jessica has a good idea for making a sphere out of six pieces, namely that the width of each piece at any given level should be 1/6 of the circumference of the sphere at that level. There’s a little more work needed (because the height at which each width will be found on the piece she makes has to be measured on the circumference), but we can handle that. In fact, we did so already 20 years ago, so I provided a link to that, and to another site I found:Hi, Jessica.What you are doing is essentially what is done to make a globe, using “gores”.We have previously discussed this here, on the Ask Dr. Math site:Making Hemispheres out of PaperI have been thinking of making a blog post out of that, including pictures and specific examples to clarify exactly what to do. In fact, if you give me specific numbers for an example, we can work through that together.Meanwhile, you can search for the terms “globe gores” to find more information and pictures. I didn’t find any sites with calculations, but here is one that gives specific directions for making a globe (with more than 6 gores):The trouble is that nothing you do with flat surfaces can be exactly spherical; what you suggest, with only six gores, will look decidedly hexagonal from the top, unless the material stretches. As a result, it might be necessary to make a couple attempts in order to find what dimensions work best for your material. We have to decide whether the width should be based on the hexagon it will really be (chords), or the sphere you want it to be (arcs). You can make a first model of paper or fabric to see how it will work, but your first leather one may have different properties!So send me what you want for a first try (radius, and height if it is not to be a complete sphere), and I’ll get back to you with some numbers and a drawing. In fact, you may be able to just scale up the drawing as needed to get any size, assuming you stick with six gores.Real products generally require (just as Jessica expected) a mathematical first draft, modified to account for the realities of the material used. We’ll see that she is just as resourceful as other craftspeople I’ve known.

Making a paper hemisphere from gores

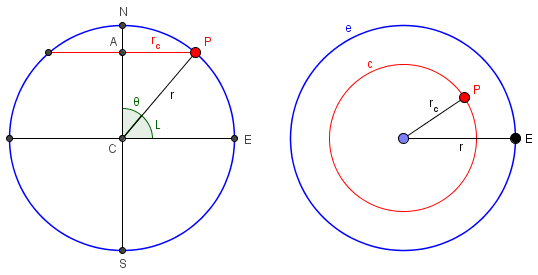
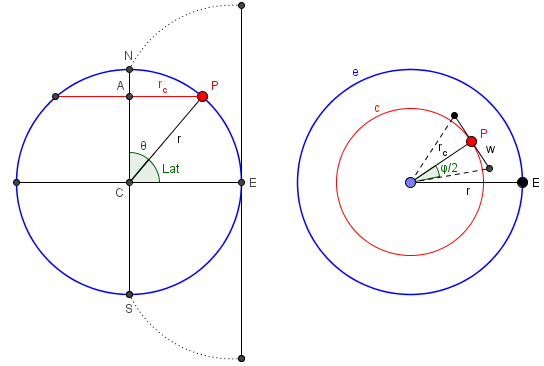
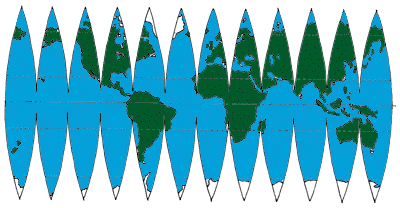
Before returning to that conversation, let’s look at the Ask Dr. Math page, which is from 1999: Making Hemispheres out of Paper I’m a high school math teacher, and I’ve been trying to figure out how you would make a sphere from a piece of paper, for example, if I wanted my geometry students to take a piece of paper and fold/cut it so that it would fit perfectly over the northern hemisphere of a globe. I first decided that I would focus on how to get a piece of paper to fold into a hemisphere. I think the best way would be to make the North Pole the center of the figure. I decided to use triangular wedges of 30 degrees. These triangular wedges are actually triangles I studied in non-Euclidean geometry because their angle measure is above 180 degrees, where the two congruent sides extending from the North Pole to the Equator are both perpendicular to the equator, but are 30 degrees apart in terms of longitudinal degrees. I can figure out the length of the base of this unique isosceles triangle, and I can also figure out the lengths of the congruent legs (since I can determine the radius). Where I have trouble is in how to convert this figure to a piece of paper. I know all three sides of this triangle are curved. I also know they are all parts of great circles. I don’t know how to actually draw these curves or what the actual angle is for the vertex angle of this isosceles triangle. What type of curves are the sides? I know the vertex angle would be less than 30 degrees when drawn on a flat piece of paper, but I don’t know what it would be in this case. Please help! What I have envisioned for the finished product (a pattern on a flat piece of paper that can be cut/folded so that it would become a hemisphere) of this figure would be similar to a flower, with the North Pole being the center of the flower, and each petal representing one of the non-Euclidean triangles. The empty spaces between these “petals” would be the unnecessary part of the hemisphere that would be folded under or cut off. Thanks for any help that you can give.What Matt called “triangles” are actually spherical triangles, with curved sides and curved interior; the reference to non-Euclidean geometry is apt. For a little about that, see Sum of Angles of a Triangle in Non-Euclidean Geometry.Here is an image from the site I referred to above, showing a set of 12 gores to make a globe:TMD0941 goresRead more: how to get rid of instant support virusMatt’s “petals” would be the top halves of these gores, joined together at the north pole and making a big *.Doctor Rick answered: Hi, Matt. I think you realize that any construction of cut and/or folded paper will not fit perfectly over a sphere. The narrower you make your wedges, the closer it will come, but you will never make a perfect sphere. To be more specific, with 30-degree wedges, any cross-section parallel to the equator will have the shape of a dodecagon rather than a circle.The equator would be divided into 12 equal parts, with 30 degrees of longitude each (just as in the example above). The method you describe, however, happens to be just what globe makers do. They make pieces of map of this shape (which they call “gores”) and glue them on a sphere. Now let’s work out the shape of the gores. We’ll make it so the center line of each gore lies exactly on a sphere of radius r. Call the angular width of each gore (the number of degrees of longitude it covers) phi. Look at an arbitrary cross-section of the globe parallel to the equator. The plane of the cross-section meets the surface of the sphere at latitude L. I will work with the co-latitude (angle measured from the pole), in radians, which I will call theta. theta = (90 – L) * pi/180 The radius of the circle that is the cross-section of the sphere is r_c = r*sin(theta) You can see this if you take another cross-section perpendicular to this one, containing the axis of the sphere. There will be a right triangle whose hypotenuse is r, one leg is r_c, and the opposite angle is theta.Here are the side cross-section Doctor Rick referred to, and the top view parallel to the equator (through a line of latitude):ADM55168 side topE is a point on the equator, N and S are the poles, and P is a point on the circle at latitude L. The cross-section of one gore is a line segment tangent to the circle at its center. We want to find the width W of this line segment. Draw a line from the center of the circle to the point of tangency, and another from the center to the end of the tangent segment (the gore). You get a right triangle with legs of length r and W/2; the angle opposite W/2 is phi/2. Simple trigonometry gives us the width of the gore as W = 2*r_c*tan(phi/2) = 2r*tan(phi/2)*sin(theta)Here I have added one gore to the picture, showing how its width is calculated, and how it wraps around to the poles:ADM55168 goreThese gores are designed to lie outside the sphere, so that with a little wrinkling they could be pressed down onto the sphere; if the material were stretchable, you could make the sides, rather than the midline, of each gore lie on the sphere, and stretch the inside onto the sphere. The distance (along the arc of the globe) from the point of the gore to the line whose width we have just measured is r*theta. (Remember, theta is measured in radians.) The full length of a gore, from tip to tip, is pi*r. (The gore for a hemisphere will be half this, or pi*r/2.) If you lay it out on graph paper so that the tip is at the origin and the centerline is along the x-axis, then the two sides of the gore will lie along the lines y = +/- r*tan(phi/2)*sin(x/r) So that’s the shape of the sides of the “triangle.” It’s a sine curve whose amplitude is determined by the angle phi.In the case of 6 gores, (phi = frac{2pi}{6} = frac{pi}{3}), or 60°. Then the equation for each side of the gore is $$y = 0.57735rsinfrac{x}{r}$$ As for the angle at the poles, it _will_ be exactly the angle phi. However, the sides begin curving inward quickly, so we are talking about the angle between the _tangents_ to two curved lines. The equator end of the “spherical triangle” is a vertical line at x = pi*r/2, and the sine curves are horizontal at x = pi*r/2 so the angles are both right angles.I’ll have a picture of a gore soon. I haven’t tried making one of these, so I don’t know how easy or hard it might be to assemble. I would try using a card stock rather than thin paper so it’s easier to handle; I would cut out the gores right along their edges and tape them together on the inside of the hemisphere. If that worked, I would think about fancier ways to do it. Have fun!That gives us an exact formula for the shape of a gore; but since we have to stretch or wrinkle the gore to make an exact sphere, we have some “wiggle room”, so to speak. Jessica chose to use it.
See Also  Best chinese restaurant san antonio

Good enough for hand work

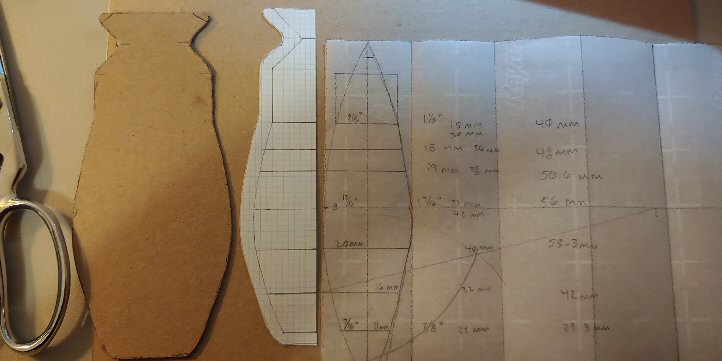
Jessica answered:Hi Doctor Peterson,Thank you for getting back to me. I am not too worried about the shape being perfectly exact, but I am using a soft split sheepskin that is only 1-2 mm thick. For my test I used a felted knit fabric I had scraps of that, which are also nice and thick to test out seams and such for the same thickness at least. But you’re right, the leather will still behave a bit differently.I went ahead and figured I’d just start with checking out the second link you sent. I followed the directions up to making the first gore and then took some measurements on it (multiplied by 8 and divided by 6) to make the start for a pattern piece on some graph paper. It turned out really well I think. I still need to figure out what I’m going to do for the top closure but that will come in time. The initial sphere size i assumed was with a 2 inch radius.TMD0941 prototype rotatedTMD0941 patternNow if I wanted to keep these exact measurements I just used, but in a larger scale, would I just multiply each one by the same amount or will that give me some distortions?Thank you for all the help, I appreciate it.
Three methods: a showdown

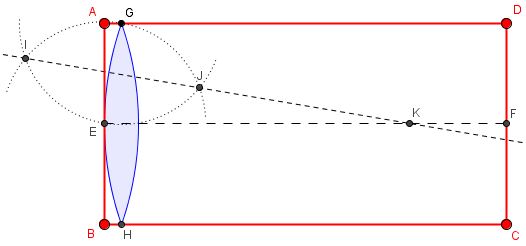
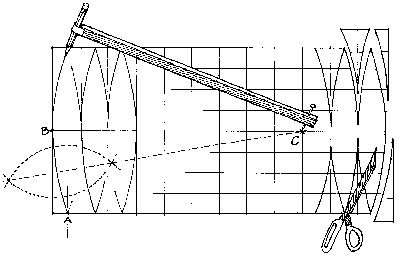
Read more: How to add header column to hive table csvThis was done, not with the calculations Doctor Rick worked out, but with the method shown on the other page I linked to. Clearly it’s good enough for Jessica’s purposes; but for me, we still have to check out the method and see how accurate it is. Here is an image of the construction from that page, which uses circles rather than the sine curves of Doctor Rick’s formula:TMD0941 constructionHere is my own drawing of the technique:TMD0941 constructThe rectangle ABCD has width equal to the circumference (EF will be the equator), and height equal to half the circumference (points on AD and BC will be at the poles). We divide the equator into n equal parts, and mark G and H so as to line up with the midpoint of one of them. Then, just assuming that the curve we need for the gore is an arc of a circle, we locate the center, K, of that circle by a standard construction (where the perpendicular bisector IJ of EG intersects EF), and draw the circle. Then we repeat this n times. Note that in the article they say to use n = 8, but the drawing has n = 12; the method is valid for any n (to the extent that it is valid at all).I wrote back with these final thoughts about this approximation:That looks great, and confirms my sense that we wouldn’t need a perfect formula to get good results.The site you used gives a rough approximation, using a circle, to what is really a sinusoid. You can do the same construction for a different number of gores just by dividing the large rectangle into 6 rather than 8 parts, and doing the same work after that.It sounds like Jessica just stretched the horizontal measurements from the 8-gore model by 8/6, and the result was good enough; the general case of the construction (taking n = 6 rather than 8) would be slightly different, but really no better.I also tried a slightly different method than Doctor Rick’s, making the width not that of the tangent line but of an arc of the sphere itself, for comparison (on the theory that stretching might give better results, and because that was Jessica’s own suggestion):Doing my own calculations, and making the width of a gore as (according to your question) a fraction of the circumference of the sphere, I get the equation of the curve on each side of it asy = R (pi/N) cos(x/R)where x is the distance from the center, R is the radius of the sphere, and N is the number of gores. By comparison, Doctor Rick’s formula gives the width of the gore as a tangent line (as you would get cutting it from stiff paper; his formula, translated into my terms, isy = R tan(pi /N) cos(x/R)So now we have three formulas for the shape of a gore: Doctor Rick’s sinusoid, mine which is a little narrower but still a sinusoid, and the other source’s circular arc.I have drawn both of those curves and the circle for N=6 (mine red, Rick’s blue, circle dotted) below. You can see that they are relatively close. If you were not satisfied with what you have already done, you might try using one of the other curves.TMD0941 comparison(I have also graphed Jessica’s stretched 8-gore version, and it is virtually indistinguishable from the dotted curve here.)You are correct that you can just scale up all distances by the same factor to enlarge this, so making one pattern as you have done is reasonable.Let me know if there is anything more I can help with. Applying math to real life makes it more interesting!This is a good example of a case where the math can be done precisely, but it doesn’t matter in real life! On the other hand, a globe maker might care more about precision than a bag maker!Read more: how to put lights in a shadow box
See Also  How To Get One End Of A Stuck Drawstring Pulled Back Out Of A Hoodie?

Last, Wallx.net sent you details about the topic “How To Make A Sphere From A Flat Sheet❤️️”.Hope with useful information that the article “How To Make A Sphere From A Flat Sheet” It will help readers to be more interested in “How To Make A Sphere From A Flat Sheet [ ❤️️❤️️ ]”.

Posts “How To Make A Sphere From A Flat Sheet” posted by on 2021-11-04 18:05:13. Thank you for reading the article at wallx.net
Rate this post
Back to top button