How to add media.net ads to WordPress
Are you looking to integrate media.net into your ad stack? In this tutorial, we’ll look at how to successfully implement media.net into WordPress to add more demand sources and increase your revenue from display ads with as little hassle as possible.
We will focus on navigating the media.net UI to create ad units and integrate them with Advanced Ads.
Before we start, let us introduce you to media.net if you haven’t heard about it before.
Media.net is one of the top 5 ad tech companies worldwide and offers a large supply of display ads across search, native, display, mobile, local, products, and video. It also provides ad optimization capabilities and one unique ad format, called display-to-search (D2S). This ad format leverages search keywords and serves search ads bought by advertisers on a CPC-base, driving higher returns for you as a publisher.
Like all platforms, the technology used by media.net evolves quickly and continuously. Also, do note that certain media.net features might be in beta (And therefore might be under testing) or deprecated at some point. If you find that this tutorial needs an update, please let me know via this page.
Before we get into the step-by-step walk-through of how to integrate media.net with Advanced ads, let us spend a moment to consider the benefits of doing so. You could, after all, integrate media.net manually or using their plugin as well.
Higher revenue opportunities through various display networks
Contents
When you use Advanced Ads, you’re never limited to one ad network only. Instead, you can both rotate and test several ad networks against each other at the same time, thereby maximizing revenue.
The truth is, most ad networks capture one piece of the market, but not another. By placing ads from one ad network manually or with a dedicated plugin provided by that ad network on your site, you’re essentially constraining your demand for a given placement to the requests which that particular network can supply.
Not so with Advanced Ads. Thanks to placements, you can create as many ads as you’d like for each network you’re working with and rotate ads or even groups of ads within one placement.
You can also set up weighted rotations. They allow you to balance how much traffic you end up sending to one particular network. As pointed out below, media.net works excellent for the UK, Canadian, and US markets. But what if your site has a 30%-70% split of the UK vs. Dutch traffic? You’d still want to leverage media.net, as it can increase your revenue but without devoting an entire placement to it.
Use placements in Advanced Ads and ensure that your media.net ads rotate against targeted ads from some other network or your direct-sold ads, with a weight of 30%. That way, you’ll know you’re only sending 30% of your traffic to media.net. Of course, you’ll be able to optimize the rotation later based on your results.
We will start working on media.net.
If you do not already dispose of a media.net account, you’ll have to sign up. Before you do so, you may want to check media.net’s guidelines for admission to the program here.
One requirement worth noting is that most of your traffic comes from the US, the UK, or Canada. These are also the markets for which they can provide the largest ad supply. Once you’ve applied, your application will take a couple of days to be reviewed. So be sure to factor in the extra time if working on a time-sensitive launch.
Once approved, at login, you’ll end up on media.net’s dashboard.
Dashboard after media.net approval
From there, you’re ready to head over to the “Ad units” tab and select “Add New”. However, keep in mind that you can paste your media.net code only on an approved domain.
So, let’s imagine that you’re working with two sites, i.e., mysitea.com and mysiteb.com. Most likely, at the time of your media.net application, you only submitted mysitea.com. But now that you’ve gotten media.net up and almost running, you want to create tags for both mysitea.com and mysiteb.com. Well, be warned: the tags won’t work on mysiteb.com until media.net also approved this second domain.
If this sounds like you, just go to the media.net Sites tab, and hit “Add New” to add your new site. Do keep in mind that each site you add will have to go through a review process, as explained above.
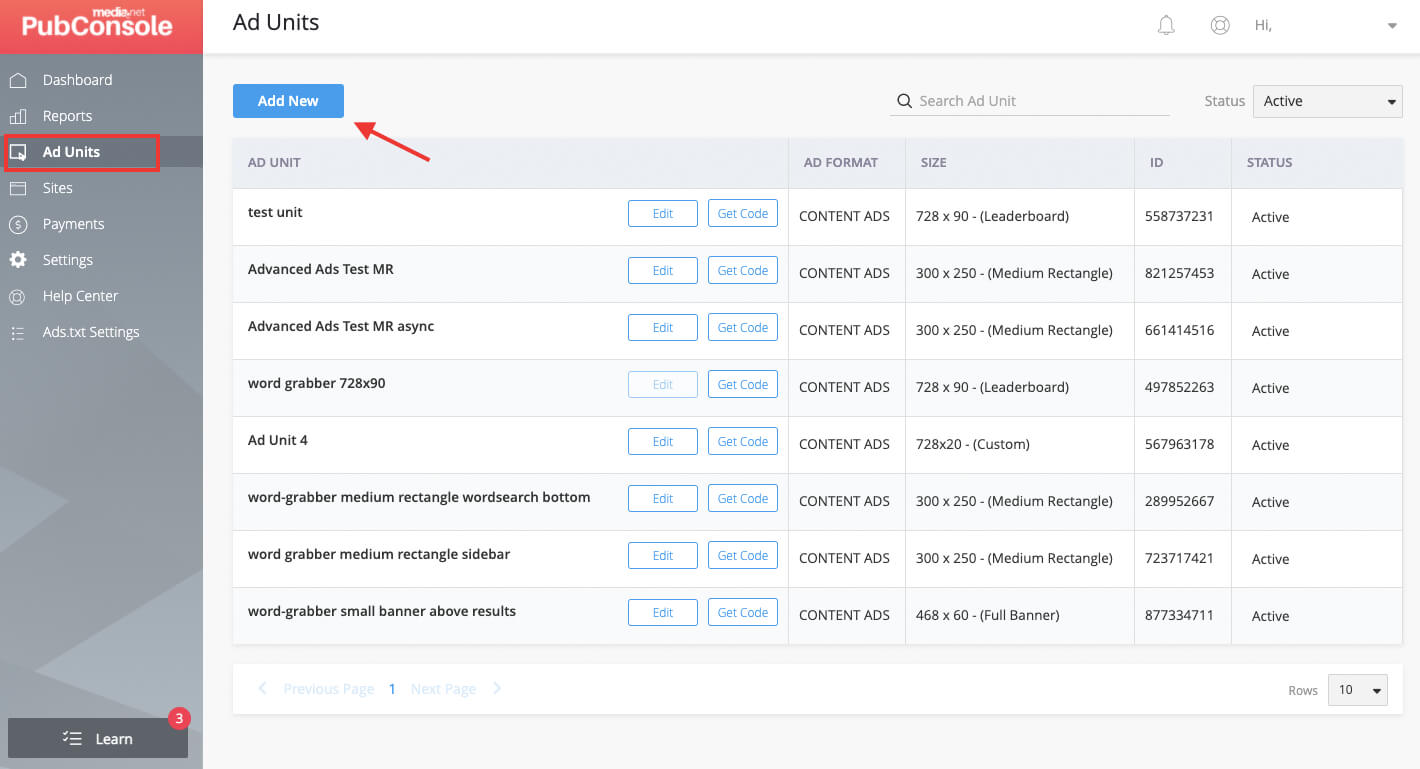 Create new media.net ads
Next, you’ll be prompted to give your ad unit a name. Select a size and establish if the ad unit should be responsive. As usual, make sure to develop some rules of nomenclature.
For example, you could call this ad unit “media.net_mysiteaa_Adsize_Placement”. Descriptive titles are especially relevant if you’re working with a sizable number of ad networks, websites, and ad sizes.
Ad sizes
Media.net recommends any of the following as their best-performing sizes:
- 300×250
- 600×250
- 728×90
- Responsive Mobile Docked Unit
Those might be suitable sizes to start with. But of course, you should weigh that against the design of your site. For more details, check out our Ad formats section below.
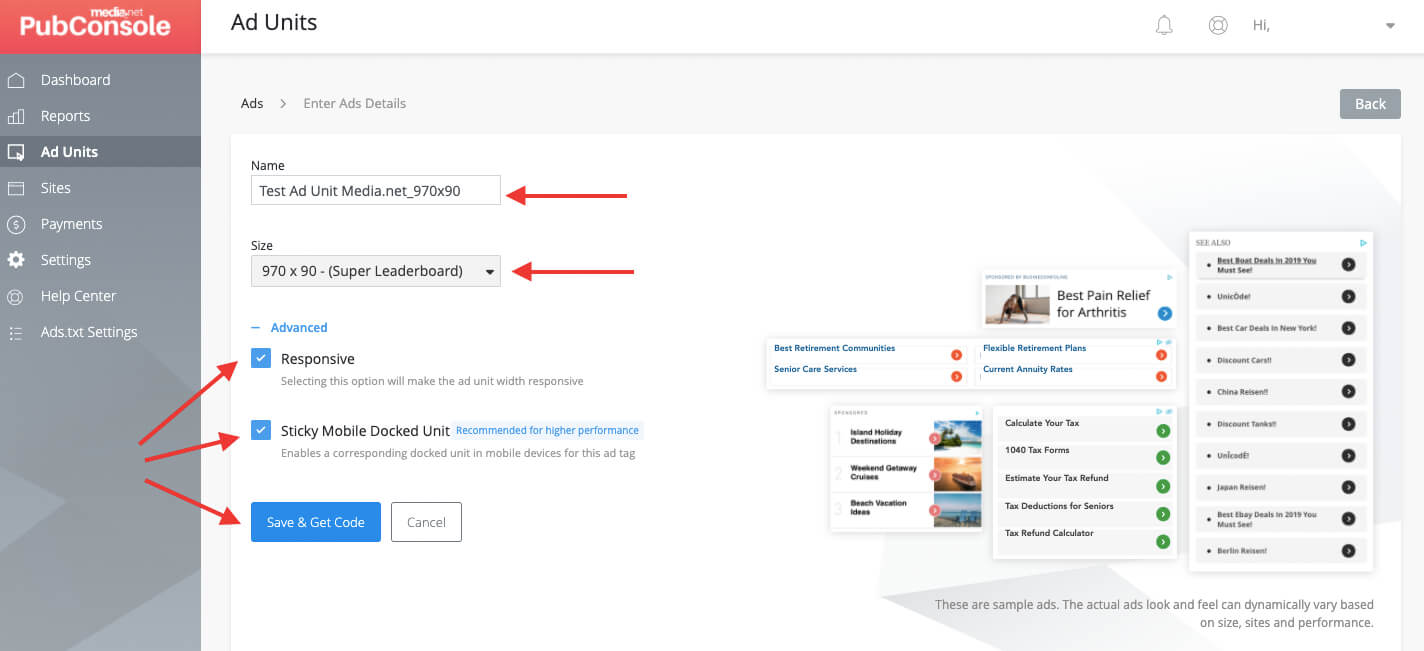 Create a new ad unit in media.net
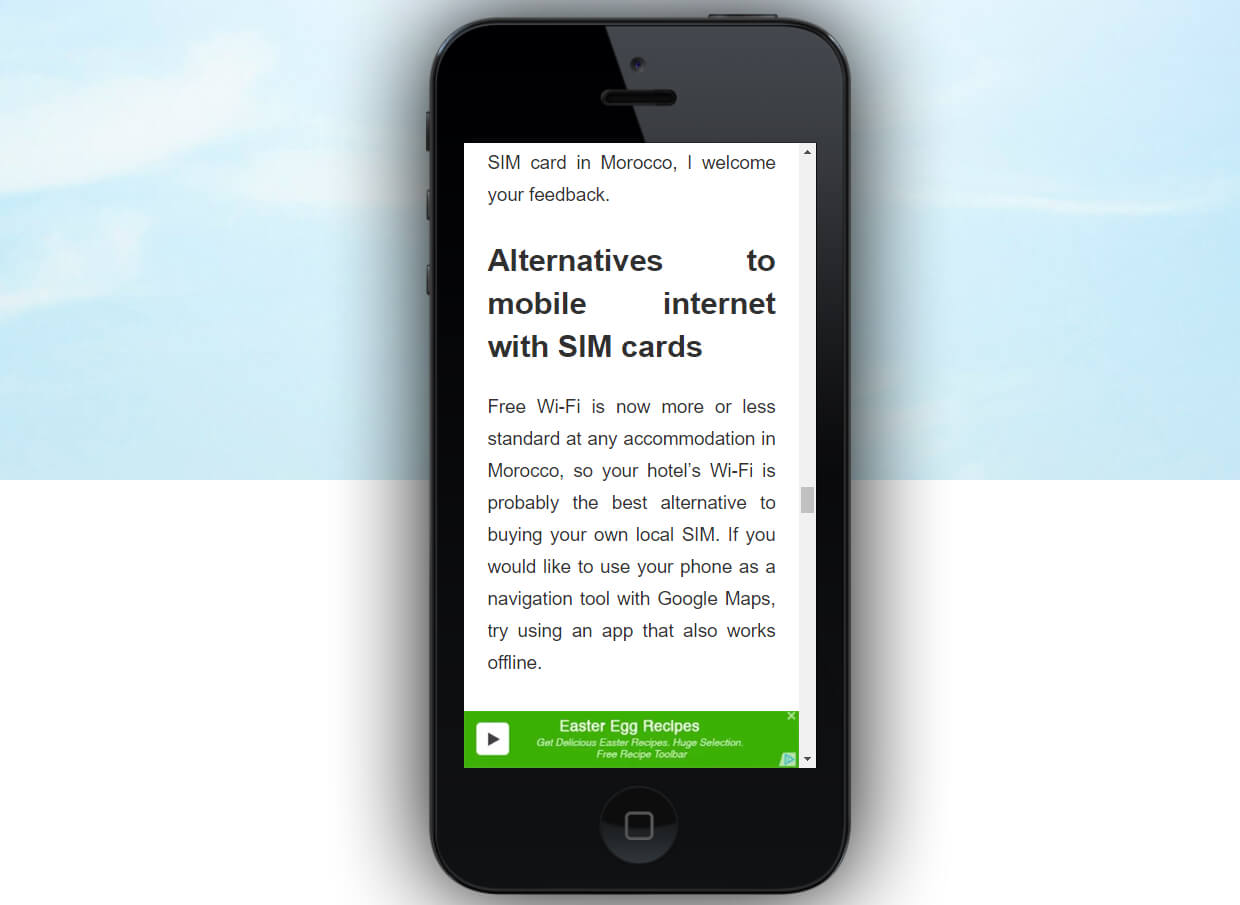
Note that the “Sticky Mobile Docked Unit” option is enabled by default. We recommend leaving that activated as it will allow you to run the same ad unit at the bottom of your mobile screen, much like you’re probably used to seeing on mobile apps.
If not, take a peek at the image below:
Hit “Save” and get ready for the next step: getting the header code and pasting it into Advanced Ads.
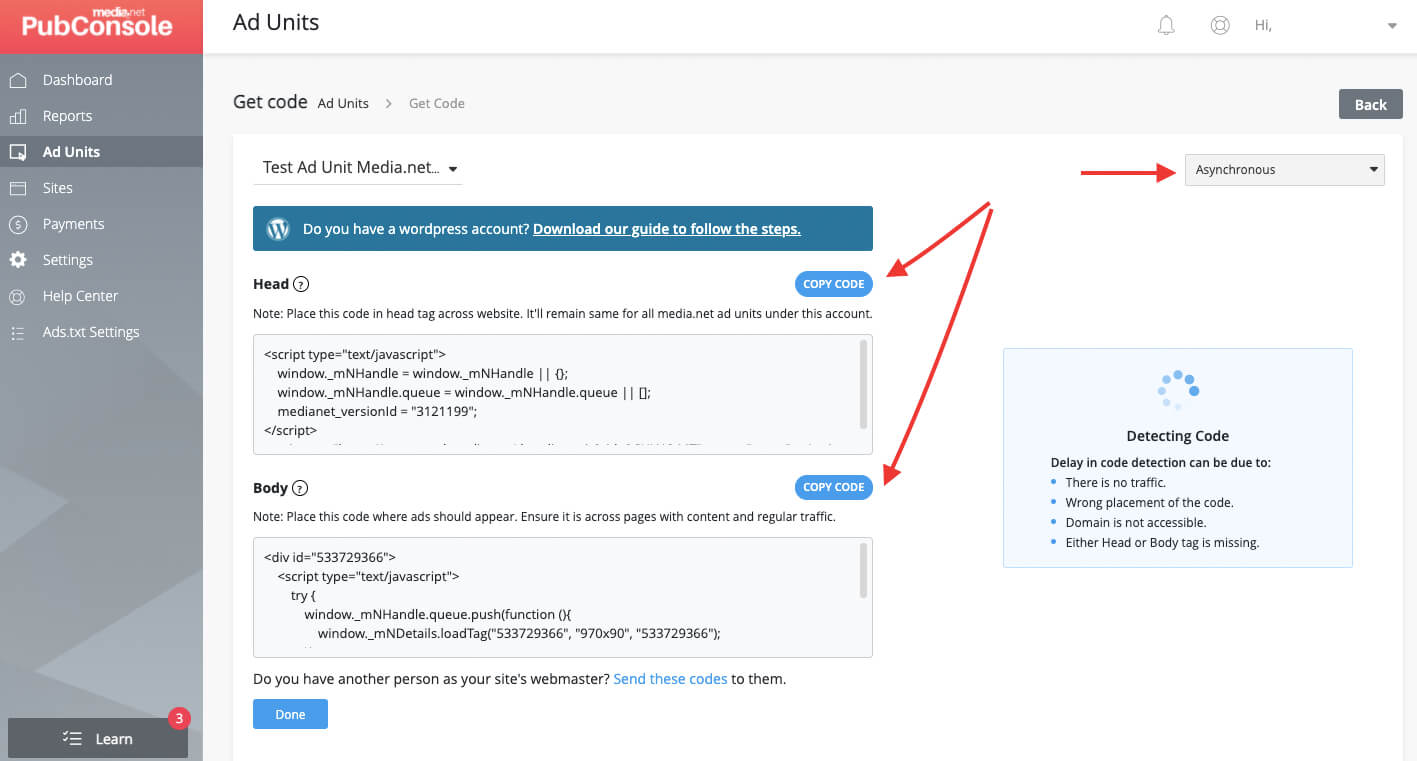
Once you hit save, you’ll be automatically directed to the “Get code” page, which media.net also makes accessible from the Ad Units dashboard. The code is, as expected, unique for each ad unit. It can be rendered as “synchronous” or “asynchronous”.
As we suggest in this article on page speed, you should use “asynchronous” tags as much as possible. They load separately from your page content and therefore decrease latency.
You’ll notice that the code consists of two parts: a header tag and a body tag. Both are necessary for optimal performance. Use the same option, synchronous or asynchronous, for both.
We’ll look first at how to implement the header tag, and later in the tutorial, on how to paste the body tag. Do keep in mind that if you were to paste the body tag on your site without its matching header tag, you’d probably end up with a blank space. Not pretty!
So, make sure your preferred option is selected, and then hit “Copy Code” next to the header tag.
We have already published a comprehensive article on how to handle header codes in WordPress with Advanced Ads. It’s a worthy read, but for this tutorial, what’s essential to know is that you’ll need to have created in Advanced Ads at least one ad unit and one placement. To make both, follow these instructions.
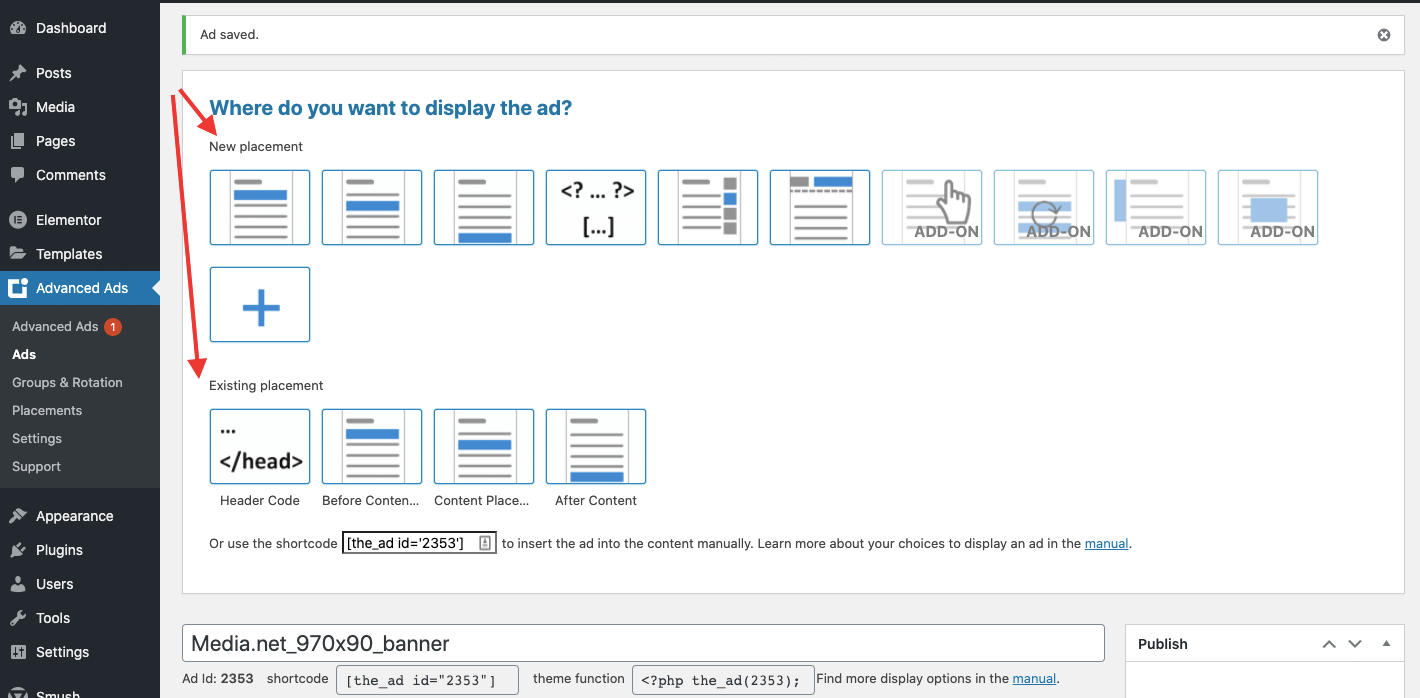
Add the header tag
Here’s how the header tag looks like when pasted inside my “Media.net_Header Code” ad unit.
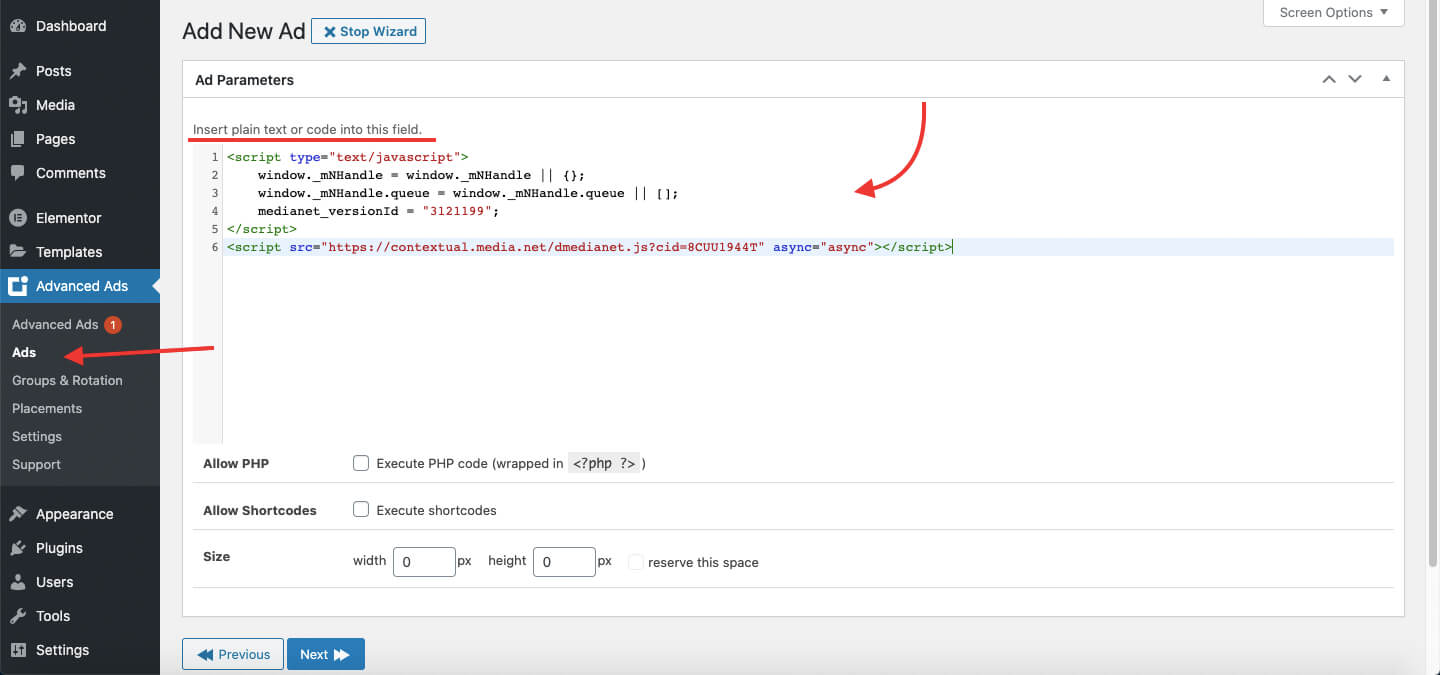
And below, you can see that same ad unit saved into my “Header Code” placement.
Note that I’ve chosen the header code placement type, which you can quickly tell apart thanks to its icon.
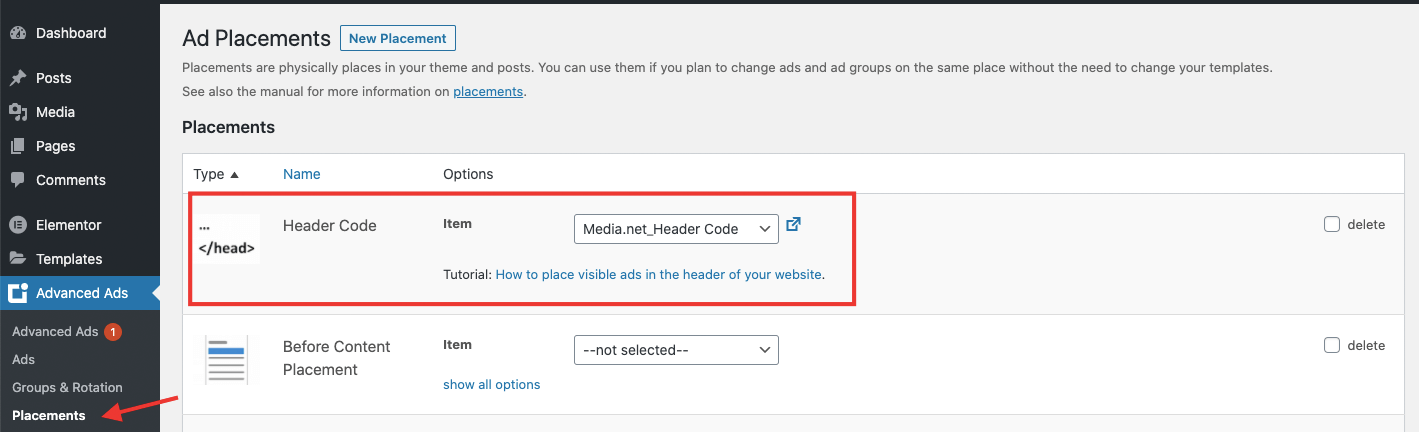 Header code placement for the media.net header tag
Place the body tag
Next, we can paste the “body tag” supplied by media.net into one of my ad units, exactly where we want the actual media.net ad to appear.
For example, suppose you want it to appear on your blog posts below the title but before the post content. In that case, you could assign the existing ad unit to a Before Content placement, or you add the Advanced Ads block to paste it there, as shown below.
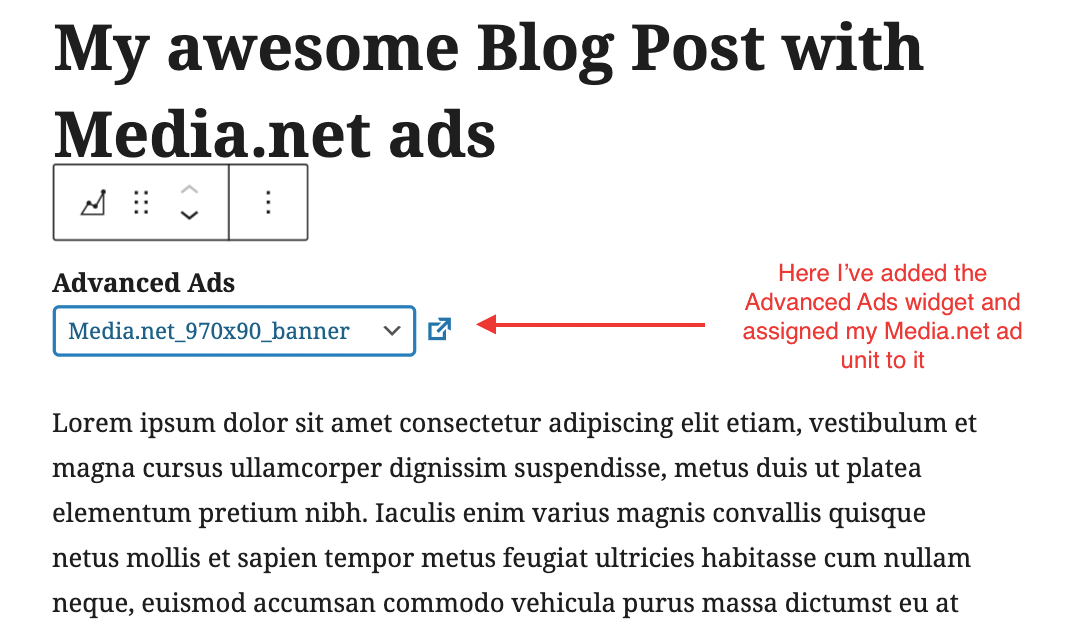 Injecting the ad unit manually with the Advanced Ads block
But let’s take it one step at a time.
It would be best if you still had your media.net account opened. Copy your body tag code of the ad unit from the “Get code” tab, as shown in the image above.
To apply it to the ad unit of your choice within Advanced Ads, proceed as follows:
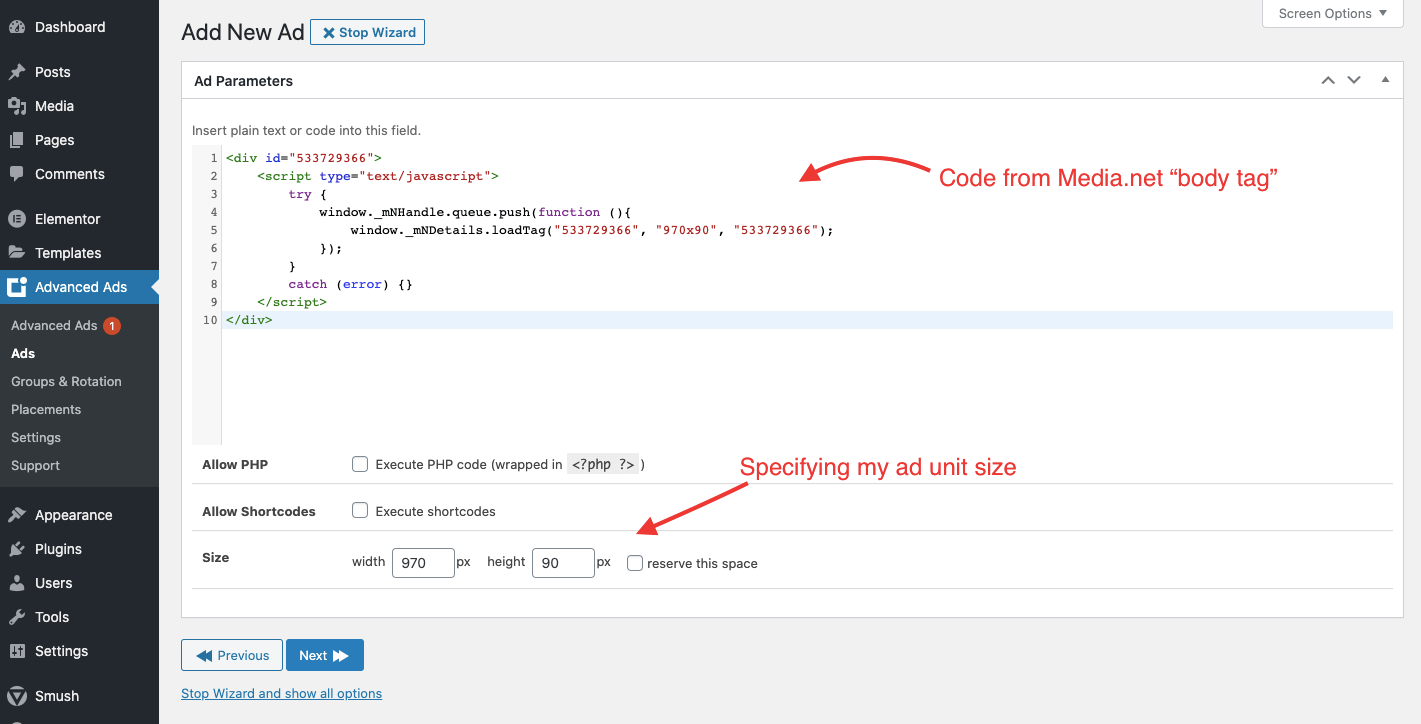
Specify the size of the media.net ad
At this point, your media.net ad should be ready to appear!
Next, we will look at how to integrate the ads.txt file from media.net.
Ads.txt
Ads.txt is an initiative by the Interactive Advertising Bureau (IAB) which aims to protect publisher’s inventory from counterfeit by letting publishers add a piece of code to their sites to declare who is specifically approved to sell their inventory on their behalf.
Simply put, there have been cases of websites being scraped in their entirety in an attempt to make money from digital advertising through 3rd party networks.
The ads.txt code ensures that even though a website gets scraped, the duplicate version of it can’t be targeted by advertisers because it doesn’t include the correct ads.txt file.
Copy your ads.txt file from media.net
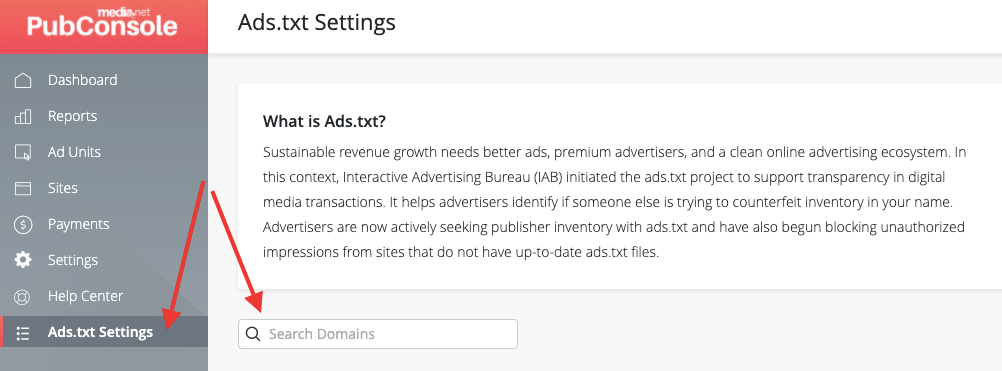
Because of this, it is highly recommendable, as the next step in your setup, to copy your ads.txt file from media.net and add it to your website. To do so, start by finding your “Ads.txt Settings” tab in your media.net account.
 Ads.txt settings of media.net
Once there, find the site you want to get your ads.txt file for and hit “Get status”.
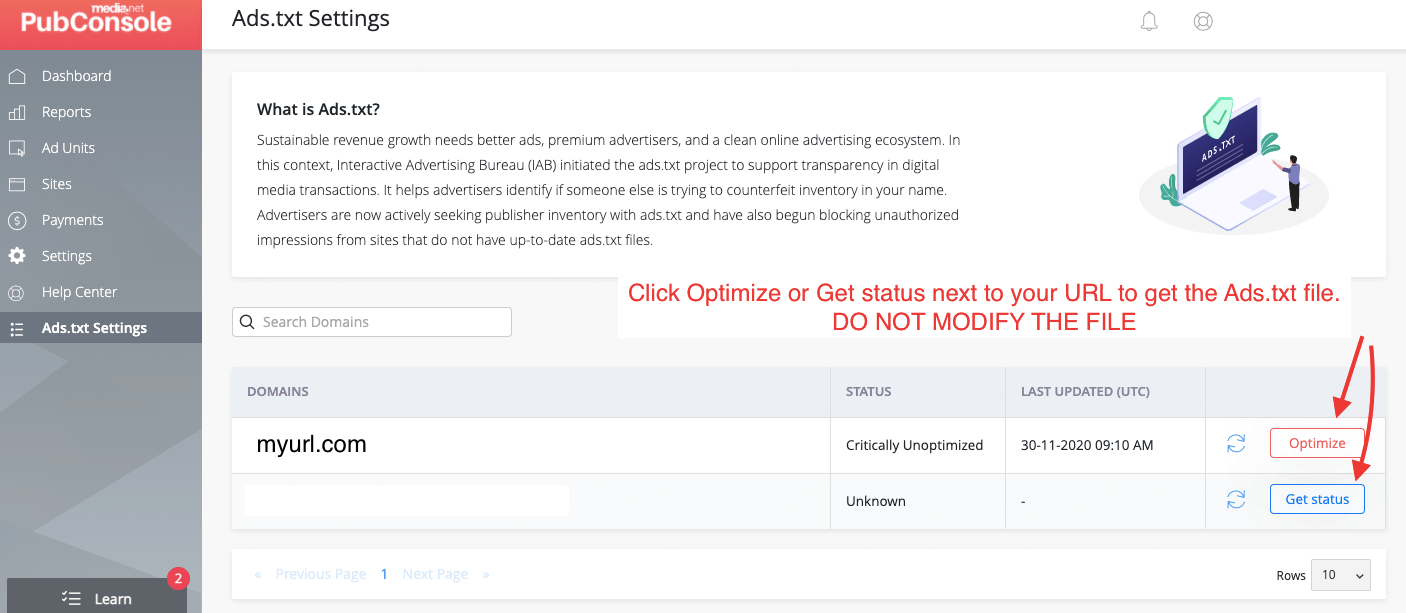
This is what you’ll see:
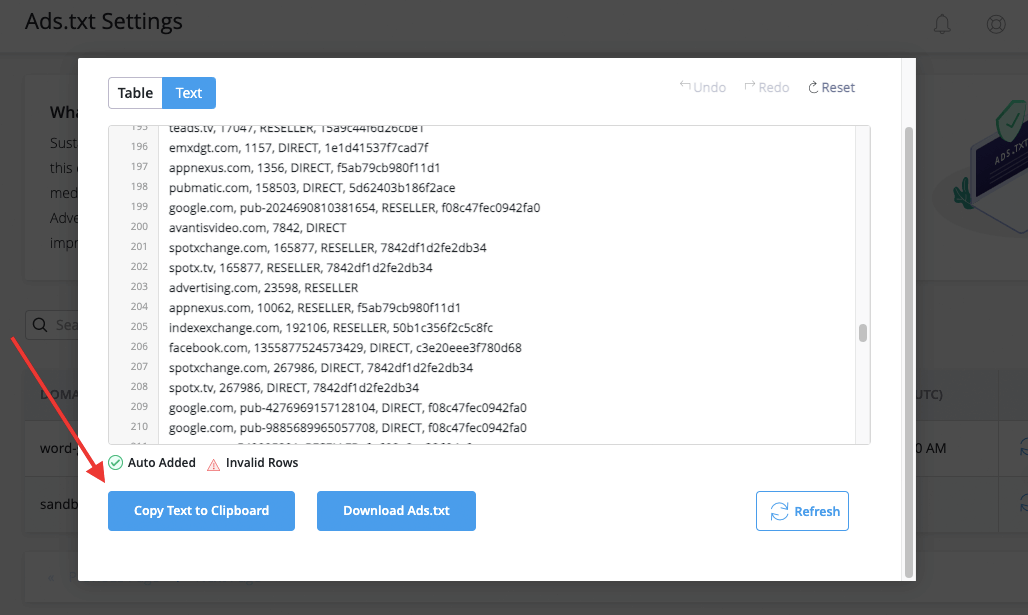
Copy the code provided, which will include a series of strings like the following:
div {
overflow: auto;
}
.shcb-language {
border: 0;
clip: rect(1px, 1px, 1px, 1px);
-webkit-clip-path: inset(50%);
clip-path: inset(50%);
height: 1px;
margin: -1px;
overflow: hidden;
padding: 0;
position: absolute;
width: 1px;
word-wrap: normal;
word-break: normal;
}
.hljs {
box-sizing: border-box;
}
.hljs.shcb-code-table {
display: table;
width: 100%;
}
.hljs.shcb-code-table > .shcb-loc {
color: inherit;
display: table-row;
width: 100%;
}
.hljs.shcb-code-table .shcb-loc > span {
display: table-cell;
}
.wp-block-code code.hljs:not(.shcb-wrap-lines) {
white-space: pre;
}
.wp-block-code code.hljs.shcb-wrap-lines {
white-space: pre-wrap;
}
.hljs.shcb-line-numbers {
border-spacing: 0;
counter-reset: line;
}
.hljs.shcb-line-numbers > .shcb-loc {
counter-increment: line;
}
.hljs.shcb-line-numbers .shcb-loc > span {
padding-left: 0.75em;
}
.hljs.shcb-line-numbers .shcb-loc::before {
border-right: 1px solid #ddd;
content: counter(line);
display: table-cell;
padding: 0 0.75em;
text-align: right;
-webkit-user-select: none;
-moz-user-select: none;
-ms-user-select: none;
user-select: none;
white-space: nowrap;
width: 1%;
}
]]>google.com, pub-1234567891234567, DIRECT, f12c34fec5672fa0
Pubmatic.com, 12345, DIRECT, 1d23456b789f1ace
indexexchange.com, 000000, DIRECT
Code language: CSS (css) Please, never ever modify these strings.
Add the entries to your ads.txt from Advanced Ads
Next, go to Advanced Ads > Settings > General > Ads.txt and enter the file’s content below any existing code you had previously added.
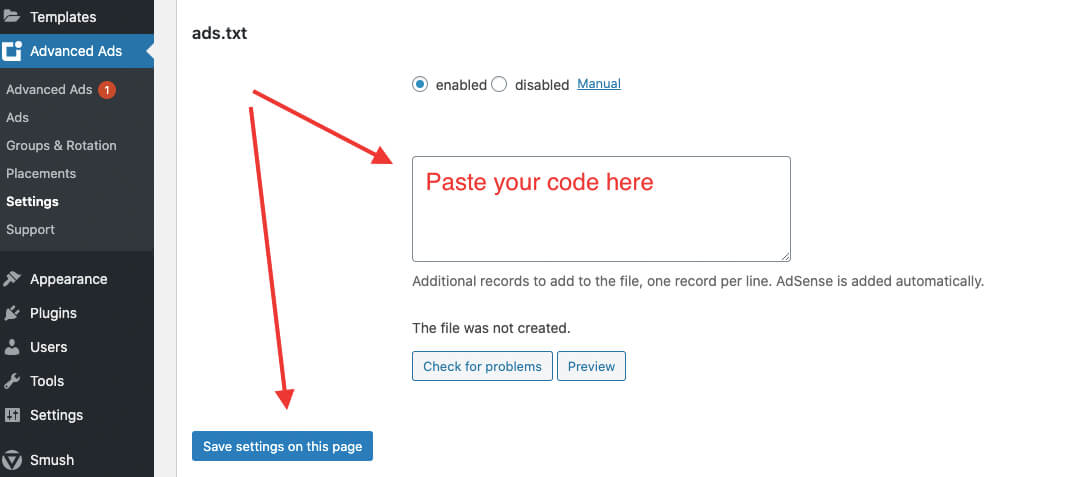
This is critical because, should you replace your previous code with the new one, you would prevent your other networks such as Adsense or the Moneytizer, or any others you’re working with from working as intended. When done, hit save.
Usually, if you implemented everything correctly, you should see an updated ads.txt status within a few days. Be patient because media.net might take a few days to crawl the ads.txt file properly and give you a status update. If nothing has changed after one week, contact your account manager at media.net and make sure to double-check that you’ve pasted the whole code.
Find further insights on the ads.txt integration into Advanced Ads in the ads.txt manual.
Ad Formats
Media.net offers, by default, a different kind of format than you might be familiar with, which they call “Two-Click Ads”. As hinted by the name, this format requires visitors of your blog to click twice on an ad for the click to be counted as such.
This format, on a green-themed website that deals with finances and saving, looks like this:
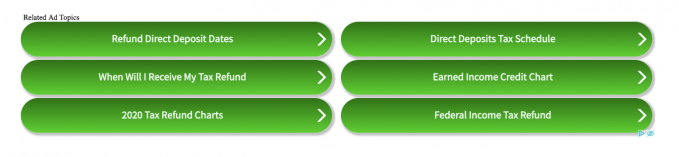
Do note that the design is established by the publisher here, not by media.net. In other words, this is not just a Two-click ad. It’s a native two-click ad.
In size, it mimics a typical display ad format. Still, the advert itself leverages search intent (i.e., it’s keywords-driven) to generate relevant search terms that should answer the visitor’s question. You can it, therefore, match to campaigns targeting conversions.
Compare that with a standard display ad, which is generally used for branding and, therefore, leverages images’ power to target a broad number of users early on in the funnel.
Native, display, and contextual ads
While the Two-click-ad is the default format offered by media.net, we recommend following the company’s prompt from their welcome e-mail. Ask for Native and Display ads, including video and mobile, to be enabled for your account as well. So that you can fully benefit from all of the formats they have to offer, and therefore drive higher revenue.
This means that to serve contextual ads, instead of search-based ads, you need to reach out to media.net.
AMP compatibility
Media.net does support AMP (Accelerated Mobile Pages), both for its Two click ads and its header bidding solution. For specific information on the configuration, one option is to check out this article on GitHub and use that information when setting up the AMP ad using the “AMP” ad type in Advanced Ads (Responsive Ads add-on).
For particular support on setting up header bidding, the best bet is to contact your media.net’s account manager, as media.net recommends it in their FAQs.
Limitations
Possibly the most significant limitations refer to the limited country coverage, which we have highlighted a few times in this article.
But also keep currency concerns in mind. The network offers payments only in USD, making earnings susceptible to exchange rate fluctuations for publishers outside of the US.
Troubleshooting and additional questions
As explained in the section on the Benefits of using Advanced Ads to integrate media.net with WordPress, using our plugin allows you to run both Adsense and Media.net alongside each other, either in the same placement or as separate ad units.
Do keep in mind the recommendations about the ads.txt file above to ensure both networks can run seamlessly and efficiently.
As clarified by Media.net in their help center, you can implement their tag through a third-party ad server, such as Google Ad Manager, AppNexus, or OpenX.
To do so, you’d have to reach out to your media.net account manager to get access to the implementation documentation. That integration does not affect your integration of Advanced ads with your ad server.
We recommend implementing networks in your ad server through a non-reserved campaign or line item priority type, such as network or price priority in Google Ad Manager or Remnant campaigns in OpenX. Using weights, CPC rates, or daily caps to limit the number of impressions sent to a number that can reasonably be filled by media.net.
For example, if media.net has usually served 5,000 impressions daily, you should set the cap to either 4,500 or 5,500 impressions, and in no cases above that, to avoid blank impressions.
Considering that media.net supplies inventory targeted to the Canadian, US, and UK markets, we recommend keeping that in mind when targeting your ad units through Advanced Ads in WordPress.
For example, suppose you have content in different languages. In that case, you could ensure to limit media.net’s ad units to countries devoted to English-speaking visitors, for example, by leveraging the “browser language“ condition of Advanced Ads.
Do keep in mind that browser language is, of course, only a proxy for language. And if your site is in English and language isn’t enough of a signal to identify users from those markets, you can use the Geo-Targeting add-on to limit the display of specific ad units only to visitors from selected countries.
To start, waiting some 15 minutes before declaring that an ad unit you’re running on your site is not working is always a best practice. The network might take a little bit to crawl your website at first and extract the information it needs to target ads appropriately.
But should your ads still fail to appear after an hour, there might be some hiccups that need fixing.
Here are a few recommended troubleshooting steps:
- Can you display any other ads through Advanced ads? If not, check out this troubleshooting guide before proceeding to troubleshoot in media.net.
- Is the site you’ve integrated with media.net approved by media.net? Go to media.net > Sites and check if the Status of the site says “Approved”.
- Have you edited the code in any way? Double-check that the code isn’t missing any components. Or better yet, copy and paste it again in the ad unit you’ve created to run it in Advanced Ads. Verify that the code is correct both in the header and body code.
- Have you added the header code to a “Head” placement as instructed and published the placement?
- Where are you located physically? Given that media.net serves ads targeted to the UK, the US, and Canada, you might want to use a VPN to visit your site from any of those locations and ensure that the ad appears correctly for visitors from those countries. Do consider the Geo-targeting add on to prevent media.net to show blank ads to visitors from other countries.
Media.net allows you to reuse the same ad unit several times on the same page and even on different websites. However, I don’t recommend this.
Using the same ad unit across several locations on your website will decrease your chances to optimize your performance in the long run. For example, you are making it hard to detect which ad units have low viewability or click-rates, as the reporting will be blended for all of the places where you’ve implemented the same ad code.
As long as you’re using synchronous or asynchronous tags consistently throughout your site, which we highly recommend, you do not need to paste the header tag for each ad unit.
In fact, the header tag looks the same, even across responsive vs. non-responsive ad units and across ad units of different sizes.
If you’re in doubt, cross-check your existing header code in diffchecker against one of the new ad units you’ve created. However, in 99% of cases, we expect the same header code to be valid and working across your entire site.

Stefania started her career in online marketing at Google in 2011, where, after a couple of years as a Google Ads specialist, she moved over to the Sales side, to support publishers small and large with their ad monetization strategy. Stefania speaks 5 languages fluently and is based on the Galician coast, where she enjoys hiking and writing.


