Bluestacks Running Slow – 5 Ways to Make BlueStacks Faster
Is Bluestacks Slow? Is BlueStacks lagging behind? You’re not alone! There are hundreds and thousands of people all over the world complaining about the same problem over and over again. This step by step guide will show you how to make BlueStacks faster.
Steps to make Bluestacks run faster
Contents
I will show you different methods you can use to troubleshoot bluestacks low performance. The settings provided below will make your Bluestacks run faster than before. So without further ado, let’s get started.
1. Adjust Display Settings in BlueStacks
BlueStacks settings menu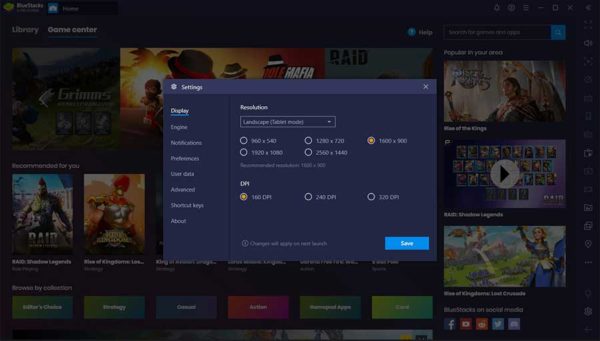
- Launch BlueStacks and on the initial screen find the hamburger menu icon on the top title bar and click on it.
- In the menu that opens, click the Settings option to open the settings window.
- The Display tab will be selected. Choose the recommended 1600×900 resolution.
- In the DPI segment, select the 160 DPI option.
Now save and exit BlueStacks and relaunch it. BlueStacks should now run without any lag.
2. Optimize and repair tool settings
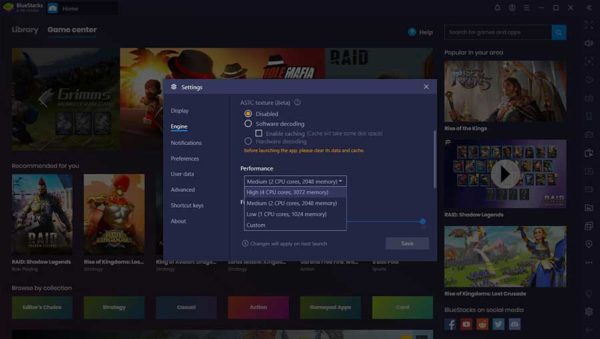
- Launch BlueStacks and when the initial screen shows up, click on the hamburger menu icon in the top right corner of the title bar to open the settings menu.
- Click the Install option to open the Settings preferences window. On that Window, click on the Tools option on the left panel.
- On the right panel, scroll down to the option that says “Performance”. Depending on the number of CPU cores available, you will see a preselected option, usually half of the cores present in your computer. The allocated RAM is also displayed. Change this to the maximum available value.
- Press the Save button and restart BlueStacks.
[Note: In older BlueStacks versions (that is, the versions less than BlueStacks 4), you can individually select the number of CPU cores and use a slider to determine the amount of RAM you want to allocate from your available RAM capacity.]
3. Close unnecessary third-party software
Just in case you don’t know, there are some third-party apps and software that often continue to run in the background even when you think you’ve closed all running apps. Identifying third-party software is often quite difficult because they run in the background, such as having multiple instances of Adobe Creative Cloud or Google Crash Handler etc. simply by closing them. To do so, follow the steps below:
- On the taskbar, right-click to open the context menu and locate Task Manager. Click it.
- When the Task Manager window opens, click the More details link at the bottom of the Window to pull up a detailed view.
- The Processes tab will be selected by default. You can see all running background processes along with CPU usage percentage and Memory usage in MB.
- Locate all the unnecessary third-party software processes you see, then click on each one and then click the End Task button at the bottom of the screen. Make sure you select only non-essential services.
Note that you only need to close non-essential services. In case you’re not sure which one is a non-essential service, don’t close it. Instead, close the Task Manager window and move on to the next few steps: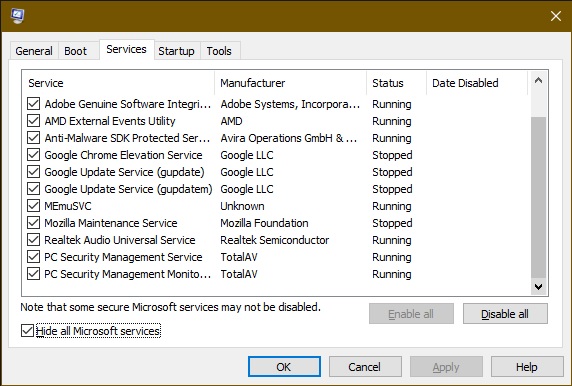
- Click on the search bar or taskbar search icon and type ‘msconfig.’ Press enter key.
- When the system configuration window opens, switch to the ‘Services’ tab.
- On the ‘Services’ tab you can see the option ‘Hide all Microsoft Services.’ Select that option. This will automatically hide any Microsoft Services running on your computer and leave a list of all third-party software services running in the background.
- All third-party services are selected by default. You can press the Disable All button to end all services from third-party providers. However, doing so will also disable the graphics and sound services.
- To prevent your graphics and audio services from being stopped, uncheck all other services, deselect audio and graphics services. In the screenshot, you can see that the graphics are provided by AMD, while Realtek Semiconductor provides the audio.
- Once you have unchecked every other service except graphics and sound, click the Apply button. This will disable all third-party software.
This will close all third-party services running on your computer and free up some additional RAM (memory) that BlueStacks can use. This will make BlueStacks faster.
4. Temporarily disable the anti-virus utility
Please note that this method can be risky as disabling your anti-virus utility can expose your computer to various threats, including malware, spyware, etc. To do this, make sure you have Windows 10 default security features enabled.
How to disable anti-virus utility?
Before learning how to turn it off, you need to understand why it should be turned off! In case you don’t know, there are specific antivirus programs like AVG and Avast that use hardware-assisted virtualization. This significantly affects the performance of BlueStacks. Turning off the feature or the whole anti-virus program will improve BlueStacks performance. One way to disable this feature is to open the main settings window of your anti-virus program and identify it and uncheck it. If you can’t find that option, the next best thing that you can do is turn off your antivirus completely for a while. The steps involved are:
- Find the anti-virus program’s system tray icon and right-click it. From the context menu, select the disable option. If this option is not available, you can move on to the next steps.
- Click the search icon or the search bar on the Windows taskbar and type ‘msconfig.’
- When the system configuration window opens, switch to the ‘Services’ tab and select the option that says ‘Hide all Microsoft Services’. This will leave only third-party services, including anti-virus programs.
- Uncheck the antivirus option and click the Apply button. This will disable the anti-virus program.
Get the best Android Emulator for Windows 7.
How to enable Windows 10 Security?
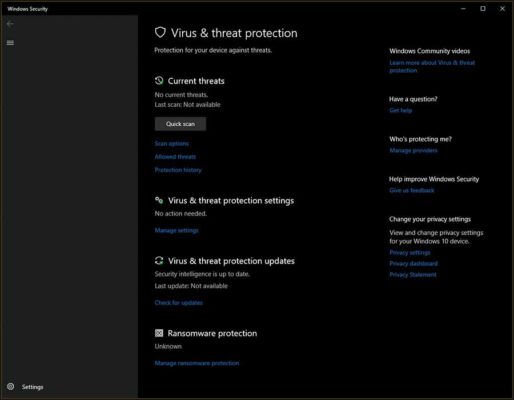
- Click the search bar or taskbar search icon and type virus & threat protection and press enter.
- This will open the Virus and threat protection Window.
- Look for the option that says ‘Virus and threat protection settings.’ Below that option you will find a link ‘Manage settings.’ Click on it to open the Next Window and enable the available options.
5. Update the graphics card driver
Sometimes, outdated graphics card drivers can cause BlueStacks lag. So try to update the driver. In case you don’t want to manually find the updated driver and then install it, you can always use a third-party application like Driver Booster 6 to scan for outdated drivers. You can use the free version of the app. The free version will show you a list of outdated drivers. However, it may not automatically download drivers for your computer. Find the driver, download and install it. There is no reason to think that Windows 10 updates will download and install the latest drivers. The Windows driver repositories may not have the latest drivers. So it’s always a good idea to download the latest drivers directly from the vendors.
- Download Bluestacks for Windows 10
- Gameloop for Windows 10
- Fixed gameloop stuck at 98
Conclusion: Making BlueStacks a bit faster isn’t really that hard. However, you need to understand that if BlueStacks is lagging, it can be due to many reasons. One of them may be because you are using an outdated version of BlueStacks, another may be because your system does not have enough resources or only has the minimum necessary resources to run BlueStacks but not There are recommended resources. Upgrading your system hardware may be the only solution in case your computer resources are not enough.
Last, Wallx.net sent you details about the topic “Bluestacks Running Slow – 5 Ways to Make BlueStacks Faster❤️️”.Hope with useful information that the article “Bluestacks Running Slow – 5 Ways to Make BlueStacks Faster” It will help readers to be more interested in “Bluestacks Running Slow – 5 Ways to Make BlueStacks Faster [ ❤️️❤️️ ]”.
Posts “Bluestacks Running Slow – 5 Ways to Make BlueStacks Faster” posted by on 2021-08-14 00:14:11. Thank you for reading the article at wallx.net


